Monthly Archives: May 2023

Creating and Uptime Kuma Server Using Docker

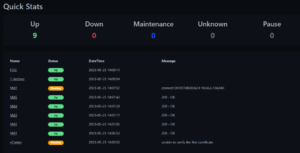
This tutorial will cover creating an Uptime Kuma server using a Docker Container. Uptime Kuma is a monitoring software meant to create simplistic dashboards that track the uptime of websites, servers, or anything that can be pinged.
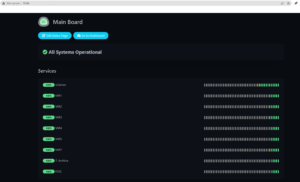
  • Assumptions
    • You have an Ubuntu 18.04/20.04/22.04 virtual/physical machine made.
    • The machine is up to date (apt-get update AND apt-get upgrade)
  • Install Docker
    • sudo apt-get install docker.io
    • You can check the installation by doing “sudo docker ps” and seeing if it outputs an error or not
  • Create an Uptime Kuma Docker volume
    • docker volume create uptime-kuma
  • Run the docker container
    • docker run -d –restart=always -p 3001:3001 -v uptime-kuma:/app/data –name uptime-kuma louislam/uptime-kuma:1
  • Connect to the interface and create a user account
    • The default web interface port is 3001 so you can navigate to the web GUI by entering IP_ADDRESS:3001 in your web browser.

Adding a NAS Drive to a Windows 2016 Server

We recently acquired 3 IceBreaker 4936 servers from DoDCFL (for free) and were looking for the best use for these bad boys.  We landed on our CCTV setup.

They are all 36-thread servers with 256GB of RAM and 216TBs of HDDs.  While the storage isn’t blazing fast by today’s standards, it is great archival storage.

Our CCTV system is Milestone, which requires the storage drives to be local.  We decided to try and set up TrueNas on the Icebreaker to allow us to greatly enhance our storage longevity.  The RAID and TrueNAS install are covered in a separate post by my excellent Miami intern (Maverick Peck), that completed that part of the process.

After TrueNas was installed we had to first setup iSCSI on the NAS.  We tried other solutions but in the end, the only one that worked with Milestone was having the drive on the recording server connect with iSCSI Initiator.

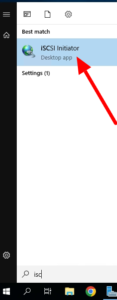
Step 1 – On the server that is connecting to the NAS, install iSCSI Initiator.  By typing iSCSI in the start bar you will get the best match of iSCSI Initiator, simply click on it.  Click the Yes button to make it a service that starts automatically in the future.


Step 2 – Set up the iSCSI Share you will be using on TrueNAS.  This YouTube video capture covers the process of:

  • Setting up the Zvol storage pool
  • Configuring the iSCSI Block Share
  • Enabling the TrueNAS iSCSI Service
  • Connecting the NAS Volume to iSCSI Initiator on your server
  • Finally, setting up the new disk in Disk Management

Hopefully this helps anyone else looking to setup a NAS and getting drives mapped as local drives on their server.

Building a TrueNAS Server on an Icebreaker 4936 Server – WIP

This blog post is a tutorial for creating and configuring a TrueNAS server with a Broadcom SAS2108 Raid Controller using RAID 1+0 (RAID 10). There will be a Youtube video linked below showing the whole setup process from start to finish.

OS: TrueNAS

  • Assumptions
    • You have already completed the “Quick Start Guide” by connecting the raid controller components to each other inside of the case.
    • The hard drives have already been slotted into the hot swap bays.
    • The system is able to be powered on and is capable of entering BIOS.
    • You have created a TrueNAS bootable USB drive.
  • Connect a keyboard and monitor to the server(a mouse is not required).
  • Power on the machine to boot to the RAID controller.
    • After the initialization screen and the HDD check screen, there will be a brief moment where you can press “ctrl + R” to boot to the RAID controller.
    • Once on the controller interface, you can select your RAID configuration. This includes the RAID level, which drives you want to use, setting up hot failover, and how many physical drives you want for each logical drive. In my case, I used RAID 10 with 18 drive logical drives (18 striped, 18 mirrored).
      • The RAID card included with this server supports RAID 0, 1, 5, 6, 10, and 50. For more information and visualizations of the different raid levels, visit the link HERE.
    • Once you are done with configuring your RAID setup, you can save and power off the machine.
  • Insert your TrueNAS USB stick into one of the free USB slots (I recommend USB 3.1 if possible).
    • Power on the machine and boot to BIOS (the key for this specific machine is “delete”.
    • Navigate to the boot section.
    • Set the first boot option to your TrueNAS USB drive
    • Save and reboot the machine
  • Go through the TrueNAS Installation
    • Once at the installation screen, you can press “1” to start the installation method.
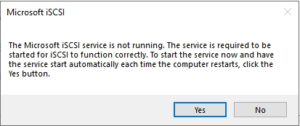
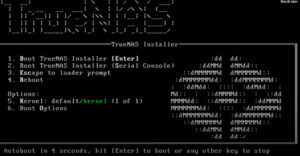
    • After the initial initialize page, you can press “1” to select the “Install/Upgrade” option
    • You will then be prompted to select which drive you want TrueNAS to be installed on
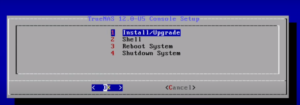
    • You can then say yes to your data being wiped, enter a password, and to “Boot Via BIOS” you can choose UEFI if you want, I just chose BIOS since it is compatible with our legacy devices.
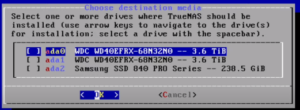
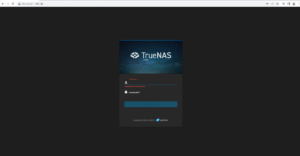
    • Say yes to creating a 16GB swap file if you have the storage for it.
    • Let the installation complete,
    •  remove the USB drive when prompted, and reboot the system. This is the last step before TrueNAS boots.
  • Enter the Web GUI
    • Once the machine has loaded the OS, you can then view the IP address in your web browser to get to the TrueNAS web GUI. The default username is “root” and the password is the one you set during the installation.

Cleaning Up BSOD NTFS Issue

Occasionally a Windows system will decide to bother us with a blue screen of death.  There are a few things we can do that may (and usually does) fix the issue.

  1.  Open Powershell as an administrator and run: sfc /scannow
    • This will search for bad windows files and replace them.
  2. Now run : DISM /Online /Cleanup-Image /RestoreHealth
    • This will really do the same but replace them from Microsoft services if the above command could not fix them.
  3. Lastly, run: chkdsk /r /f
    • This will do a checkdisk on your OS drive and attempt to repair the errors.  You technically could do this first, but I got the BSOD when I did it in that order, and fixed my issue when I did it in this order.
    • You will have to do a restart to allow the chkdsk to run on the OS drive.