All posts by Maverick Peck

Creating and Uptime Kuma Server Using Docker

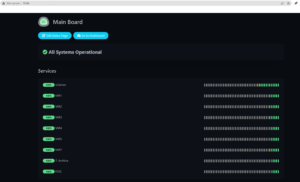
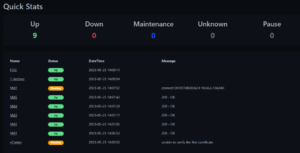
This tutorial will cover creating an Uptime Kuma server using a Docker Container. Uptime Kuma is a monitoring software meant to create simplistic dashboards that track the uptime of websites, servers, or anything that can be pinged.
  • Assumptions
    • You have an Ubuntu 18.04/20.04/22.04 virtual/physical machine made.
    • The machine is up to date (apt-get update AND apt-get upgrade)
  • Install Docker
    • sudo apt-get install docker.io
    • You can check the installation by doing “sudo docker ps” and seeing if it outputs an error or not
  • Create an Uptime Kuma Docker volume
    • docker volume create uptime-kuma
  • Run the docker container
    • docker run -d –restart=always -p 3001:3001 -v uptime-kuma:/app/data –name uptime-kuma louislam/uptime-kuma:1
  • Connect to the interface and create a user account
    • The default web interface port is 3001 so you can navigate to the web GUI by entering IP_ADDRESS:3001 in your web browser.
Building a TrueNAS Server on an Icebreaker 4936 Server – WIP

This blog post is a tutorial for creating and configuring a TrueNAS server with a Broadcom SAS2108 Raid Controller using RAID 1+0 (RAID 10). There will be a Youtube video linked below showing the whole setup process from start to finish.

OS: TrueNAS

  • Assumptions
    • You have already completed the “Quick Start Guide” by connecting the raid controller components to each other inside of the case.
    • The hard drives have already been slotted into the hot swap bays.
    • The system is able to be powered on and is capable of entering BIOS.
    • You have created a TrueNAS bootable USB drive.
  • Connect a keyboard and monitor to the server(a mouse is not required).
  • Power on the machine to boot to the RAID controller.
    • After the initialization screen and the HDD check screen, there will be a brief moment where you can press “ctrl + R” to boot to the RAID controller.
    • Once on the controller interface, you can select your RAID configuration. This includes the RAID level, which drives you want to use, setting up hot failover, and how many physical drives you want for each logical drive. In my case, I used RAID 10 with 18 drive logical drives (18 striped, 18 mirrored).
      • The RAID card included with this server supports RAID 0, 1, 5, 6, 10, and 50. For more information and visualizations of the different raid levels, visit the link HERE.
    • Once you are done with configuring your RAID setup, you can save and power off the machine.
  • Insert your TrueNAS USB stick into one of the free USB slots (I recommend USB 3.1 if possible).
    • Power on the machine and boot to BIOS (the key for this specific machine is “delete”.
    • Navigate to the boot section.
    • Set the first boot option to your TrueNAS USB drive
    • Save and reboot the machine
  • Go through the TrueNAS Installation
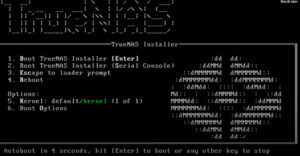
    • Once at the installation screen, you can press “1” to start the installation method.
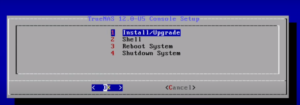
    • After the initial initialize page, you can press “1” to select the “Install/Upgrade” option
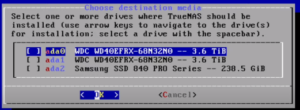
    • You will then be prompted to select which drive you want TrueNAS to be installed on
    • You can then say yes to your data being wiped, enter a password, and to “Boot Via BIOS” you can choose UEFI if you want, I just chose BIOS since it is compatible with our legacy devices.
    • Say yes to creating a 16GB swap file if you have the storage for it.
    • Let the installation complete,
    •  remove the USB drive when prompted, and reboot the system. This is the last step before TrueNAS boots.
  • Enter the Web GUI
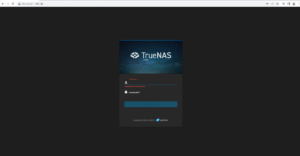
    • Once the machine has loaded the OS, you can then view the IP address in your web browser to get to the TrueNAS web GUI. The default username is “root” and the password is the one you set during the installation.

Creating an Ubuntu 22.04 Archive/Backup Server

This blog post is oriented toward creating a backup server using Linux Ubuntu 22.04 (or basically any fairly recent version of Ubuntu Linux)

All commands are in RED!

All actions are in BLUE!

All variables are in GREEN!

OS: Ubuntu 22.04

  • Assumptions
    • You already have a VM/Physical machine set up
    • You have 2 connected drives (still need to be configured)
    • You have gone through the Ubuntu setup steps (creating an account, installing the OS, and are currently on the Desktop)
    • You will be doing this whole install as the root user (I will provide the command in the instructions)
  • Open Terminal
    • Enable Root
      • sudo -i
        • Enter password
    • Update Linux/Packages
      • apt-get update
      • apt-get upgrade
    • Install gparted (for configuring drives and partitions)
      • apt-get install gparted
        • Y
    • Open gparted
      • gparted
    • Change the disk you are viewing to the one you need to add/create partitions for using the dropdown located at the top right of the program
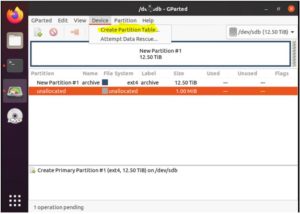
    • Create a new partition table
      • Click device tab
        • Click “Create Partition Table”
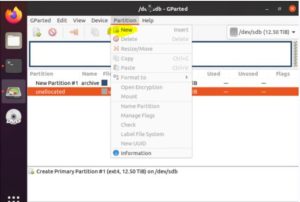
    • Create a new Partition
      • Partition tab
        • Click “New”
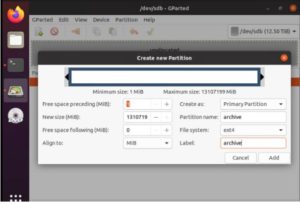
      • Enter the following settings (mostly default, the name of the partition can change)
        • Click “Add” in the bottom right
      • Click the green checkmark to apply the settings you changed
    • Give yourself permission to edit the partition you made
      • Open terminal
        • Cd /media/LINUX USERNAME/
        • To list your disks, enter “ls -l’
        • Change permissions of the drives
          • Chown YOUR_USERNAME:YOUR_USERNAME PARTITION_NAME/
      • The path to your drive is now in /media/YOUR_USERNAME/PARTITION_NAME
    • Create 2 folders and create identical subfolders for each backup you need
      • Folder 1 – mnt
        • Folder 1 – TestBU1
        • Folder 2 – TestBU2
        • Folder 3 – TestBU3
      • Folder 2 – backups
        • Folder 1 – TestBU1
        • Folder 2 – TestBU2
        • Folder 3 – TestBU3
    • Create a script on the Desktop called “archive.txt”
      • Add a “shebang” line
        • #!/bin/sh
      • Enter the commands to mount the backups to the /mnt/ directory
        • mount -t cifs -o username=<WINDOWS ACCOUNT USERNAME>,password=<WINDOWS ACCOUNT PASSWORD> //<IP ADDRESS OF SHARE>/<SHARE NAME> / /media/<LINUX ACCOUNT NAME>/<PARTITION NAME>/mnt/TestBU1
          • EX: mount -t cifs -o username=winbackups,password=backmeup //192.168.0.100/share/ /media/LINUX ACCOUNT NAME/PARTITION NAME/mnt/TestBU1
      • Enter the commands to navigate to that directory
        • cd /media/<LINUX ACCOUNT NAME>/PARTITION NAME/mnt/TestBU1
      • Enter the commands to copy the files from the /mnt/ to the /backups/ directory
        • cp -ur //media/<LINUX ACCOUNT NAME>/<PARTITION NAME>/mnt/TestBU1/foo.txt //media/<LINUX ACCOUNT NAME>/<PARTITION NAME>/backups/TestBU1
      • Enter the commands to exit to the root directory
        • cd /
      • The following would be an example of the finished file
        • #!/bin/sh#Test1BU
          cd /
          mount -t cifs -o username=winbackups,password=backmeup //192.168.0.100/share1/ /media/larchive/archive/mnt/TestBU1
          cp -ur /media/larchive/archive/mnt/TestBU1/foo1.txt /media/larchive/archive/backups/Test1BU

          #Test2BU
          cd /
          mount -t cifs -o username=winbackups,password=backmeup //192.168.0.100/share2/ /media/larchive/archive/mnt/TestBU2
          cp -ur /media/larchive/archive/mnt/TestBU2/foo2.txt /media/larchive/archive/backups/Test2BU

          #Test3BU
          cd /
          mount -t cifs -o username=winbackups,password=backmeup //192.168.0.100/share3/ /media/larchive/archive/mnt/TestBU3
          cp -ur /media/larchive/archive/mnt/TestBU3/foo3.txt /media/larchive/archive/backups/Test3BU

    • OPTIONAL: Make it a cron job
      • Open terminal
        • cd /etc/cron.weekly/
        • cp man-db /home/LINUX ACCOUNT NAME/Desktop
      • Edit the man-db file and add your own custom commands (it will contain exactly what is in the archive.txt file you made).
      • Rename the “man-db” file on the desktop to “archive” 
        • sudo cp /home/LINUX ACCOUNT NAME/Desktop/archive/ /etc/cron.weekly/
      • This job should now run weekly

Creating a Nagios Core Monitoring Server

Nagios Core (formerly known as just Nagios) is a free tool that can be used to monitor networking equipment, server equipment, and general networking infrastructure. This is a command line tutorial therefore this can be done on either the desktop or the CLI version of Linux.

  • OS Requirements
    • Ubuntu Linux 20.04
  • Install Required Packages
    • apt install wget unzip curl openssl build-essential libgd-dev libssl-dev libapache2-mod-php php-gd php apache2 -y
  • Install nagios core
  • Extract the downloaded files.
    • sudo tar -zxvf nagios-4.4.6.tar.gz
  • Navigate to the setup directory.
    • cd nagios-4.4.6
  • Run the Nagios Core configure script.
    • sudo ./configure
  • Compile the main program and CGIs.
    • sudo make all
  • Make and install group and user.
    • sudo make install-groups-users
  • Add www-data directories user to the nagios group.
    • sudo usermod -a -G nagios www-data
  • Install Nagios.
    • sudo make install
  • Initialize all the installation configuration scripts.
    • sudo make install-init
  • Install and configure permissions on the configs’ directory.
    • sudo make install-commandmode
  • Install sample config files.
    • sudo make install-config
  • Install apache files.
    • sudo make install-webconf
  • Enable apache rewrite mode.
    • sudo a2enmod rewrite
  • Enable CGI config.
    • sudo a2enmod cgi
  • Restart the Apache service.
    • sudo systemctl restart apache2
  • Create a user and set the password when prompted.
    $ sudo htpasswd -c /usr/local/nagios/etc/htpasswd.users admin

How To Create a Mirth Connect Server On Ubuntu 20.04

  1. Create an Ubuntu Desktop VM
  2. Change IP address to desired address either through DHCP or statically on the machine
  3. Update Linux
    1. apt-get update
    2. apt-get upgrade
  4. Install Java and SQL
    1. Open the terminal
      1. sudo apt install default-jre
    2. Install sql
      1. sudo apt install mysql-server
  5. Make sure java installed
    1. Open terminal
      1. Java -version
  6. Go to https://www.nextgen.com/products-and-services/mirth-connect-downloads 
    1. Download the Linux.tar.gz file for the Linux installation
    2. Install the Administrator version as well
  7. Extract the 2 downloads and move them to the /opt/ directory 
    1. tar -xvzf /path/to/filename.tar.gz
  8. Open New terminal
    1. Move downloads from desktop to /opt/ directory
      1. Cd Desktop/
      2. Sudo mv /DOWNLOAD ONE NAME/ /opt/
      3. Sudo mv /DOWNLOAD TWO NAME/ /opt/
  9. Confirm that the files are in the /opt/ directory
    1. cd /opt/
    2. ls
      1. There should be 2 files in the /opt/ directory (the two you downloaded and moved)
  10. Enter the mirth file to find the configuration file
    1. cd Mirth\ Connect/
    2. ls
    3. cd /conf
    4. ONLY DO THIS IF YOU WISH TO EDIT CONFIG FILE
      1. nano mirth.properties
      2. You will not be free to edit the configuration files.
    5. Cat mirth.properties
      1. You should now be in the server properties of mirth. Edit these files if you wish to (username, password, port numbers)
  11. Lave the configuration file
    1. Cd ..
  12. Launch the server
    1. ./mcserver
  13. Connect to the server via web browser

IF YOU DECIDE TO USE THE ADMIN PROGRAM

  1. Open a new terminal window
  2. Navigate to /opt/ directory
    1. Cd /opt/
  3. Go into the mirth admin program
    1. cd mirth-administrator-launcher/
  4. Run the launcher
    1. ./launcher
    2. You should not be loading into the admin panel where you can enter your server credentials.

Exporting a Docker Image to Docker Hub

  1. Enter the root user account
    1. sudo -i
  2. View current running docker containers to find the one you want to upload
    1. Docker ps -a
  3. You can make sure its the correct machine by interfacing with it and checking the files
    1. Docker exec -it <CONTAINER ID> (EX: 50b2e9d0dff6) bash
      1. Docker exec -it 50b2e9d0dff6 bash
      2. Here you can use it as you would a regular CMD Linux PC
      3. To exit the container, do the command: “exit”
  4. Commit Container to an Image (This turns the container into a docker image for reuse)
    1. Docker commit <CONTAINER ID> <DOCKER HUB USERNAME>/<Your_Image_Name>
      1. EX: docker commit 50b2e9d0dff6 mpeck/ubuntu-modified
  5. Log into your Docker Hub account on the docker-machine
    1. docker login
      1. You will then enter your docker hub username and password
  6. Push the docker image to Docker Hub
    1. docker push <username>/<Image_Name>
      1. EX: docker push mpeck/ubuntu-modified
  7. Check Docker Hub
    1. https://hub.docker.com/
    2. Log into the account you used to push the container
    3. Check the “repository” tab for your container.