This blog post is oriented toward creating a backup server using Linux Ubuntu 22.04 (or basically any fairly recent version of Ubuntu Linux)
All commands are in RED!
All actions are in BLUE!
All variables are in GREEN!
OS: Ubuntu 22.04
- Assumptions
- You already have a VM/Physical machine set up
- You have 2 connected drives (still need to be configured)
- You have gone through the Ubuntu setup steps (creating an account, installing the OS, and are currently on the Desktop)
- You will be doing this whole install as the root user (I will provide the command in the instructions)
- Open Terminal
- Enable Root
- sudo -i
- Enter password
- sudo -i
- Update Linux/Packages
- apt-get update
- apt-get upgrade
- Install gparted (for configuring drives and partitions)
- apt-get install gparted
- Y
- apt-get install gparted
- Open gparted
- gparted
- Change the disk you are viewing to the one you need to add/create partitions for using the dropdown located at the top right of the program
- Create a new partition table
- Click device tab
- Click “Create Partition Table”
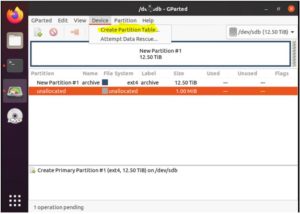
- Click device tab
- Create a new Partition
- Partition tab
- Click “New”

- Enter the following settings (mostly default, the name of the partition can change)
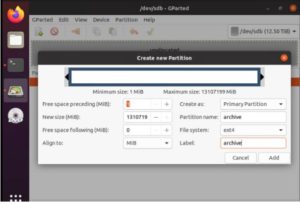
- Click “Add” in the bottom right
- Click the green checkmark to apply the settings you changed
- Partition tab
- Give yourself permission to edit the partition you made
- Open terminal
- Cd /media/LINUX USERNAME/
- To list your disks, enter “ls -l’
- Change permissions of the drives
- Chown YOUR_USERNAME:YOUR_USERNAME PARTITION_NAME/
- The path to your drive is now in /media/YOUR_USERNAME/PARTITION_NAME
- Open terminal
- Create 2 folders and create identical subfolders for each backup you need
- Folder 1 – mnt
- Folder 1 – TestBU1
- Folder 2 – TestBU2
- Folder 3 – TestBU3
- Folder 2 – backups
- Folder 1 – TestBU1
- Folder 2 – TestBU2
- Folder 3 – TestBU3
- Folder 1 – mnt
- Create a script on the Desktop called “archive.txt”
- Add a “shebang” line
- #!/bin/sh
- Enter the commands to mount the backups to the /mnt/ directory
- mount -t cifs -o username=<WINDOWS ACCOUNT USERNAME>,password=<WINDOWS ACCOUNT PASSWORD> //<IP ADDRESS OF SHARE>/<SHARE NAME> / /media/<LINUX ACCOUNT NAME>/<PARTITION NAME>/mnt/TestBU1
- EX: mount -t cifs -o username=winbackups,password=backmeup //192.168.0.100/share/ /media/LINUX ACCOUNT NAME/PARTITION NAME/mnt/TestBU1
- mount -t cifs -o username=<WINDOWS ACCOUNT USERNAME>,password=<WINDOWS ACCOUNT PASSWORD> //<IP ADDRESS OF SHARE>/<SHARE NAME> / /media/<LINUX ACCOUNT NAME>/<PARTITION NAME>/mnt/TestBU1
- Enter the commands to navigate to that directory
- cd /media/<LINUX ACCOUNT NAME>/PARTITION NAME/mnt/TestBU1
- Enter the commands to copy the files from the /mnt/ to the /backups/ directory
- cp -ur //media/<LINUX ACCOUNT NAME>/<PARTITION NAME>/mnt/TestBU1/foo.txt //media/<LINUX ACCOUNT NAME>/<PARTITION NAME>/backups/TestBU1
- Enter the commands to exit to the root directory
- cd /
- The following would be an example of the finished file
- #!/bin/sh#Test1BU
cd /
mount -t cifs -o username=winbackups,password=backmeup //192.168.0.100/share1/ /media/larchive/archive/mnt/TestBU1
cp -ur /media/larchive/archive/mnt/TestBU1/foo1.txt /media/larchive/archive/backups/Test1BU#Test2BU
cd /
mount -t cifs -o username=winbackups,password=backmeup //192.168.0.100/share2/ /media/larchive/archive/mnt/TestBU2
cp -ur /media/larchive/archive/mnt/TestBU2/foo2.txt /media/larchive/archive/backups/Test2BU#Test3BU
cd /
mount -t cifs -o username=winbackups,password=backmeup //192.168.0.100/share3/ /media/larchive/archive/mnt/TestBU3
cp -ur /media/larchive/archive/mnt/TestBU3/foo3.txt /media/larchive/archive/backups/Test3BU
- #!/bin/sh#Test1BU
- Add a “shebang” line
- OPTIONAL: Make it a cron job
- Open terminal
- cd /etc/cron.weekly/
- cp man-db /home/LINUX ACCOUNT NAME/Desktop
- Edit the man-db file and add your own custom commands (it will contain exactly what is in the archive.txt file you made).
- Rename the “man-db” file on the desktop to “archive”
- sudo cp /home/LINUX ACCOUNT NAME/Desktop/archive/ /etc/cron.weekly/
- This job should now run weekly
- Open terminal
- Enable Root