All posts by Brian Pool

Intel Core i5-9600KF Review

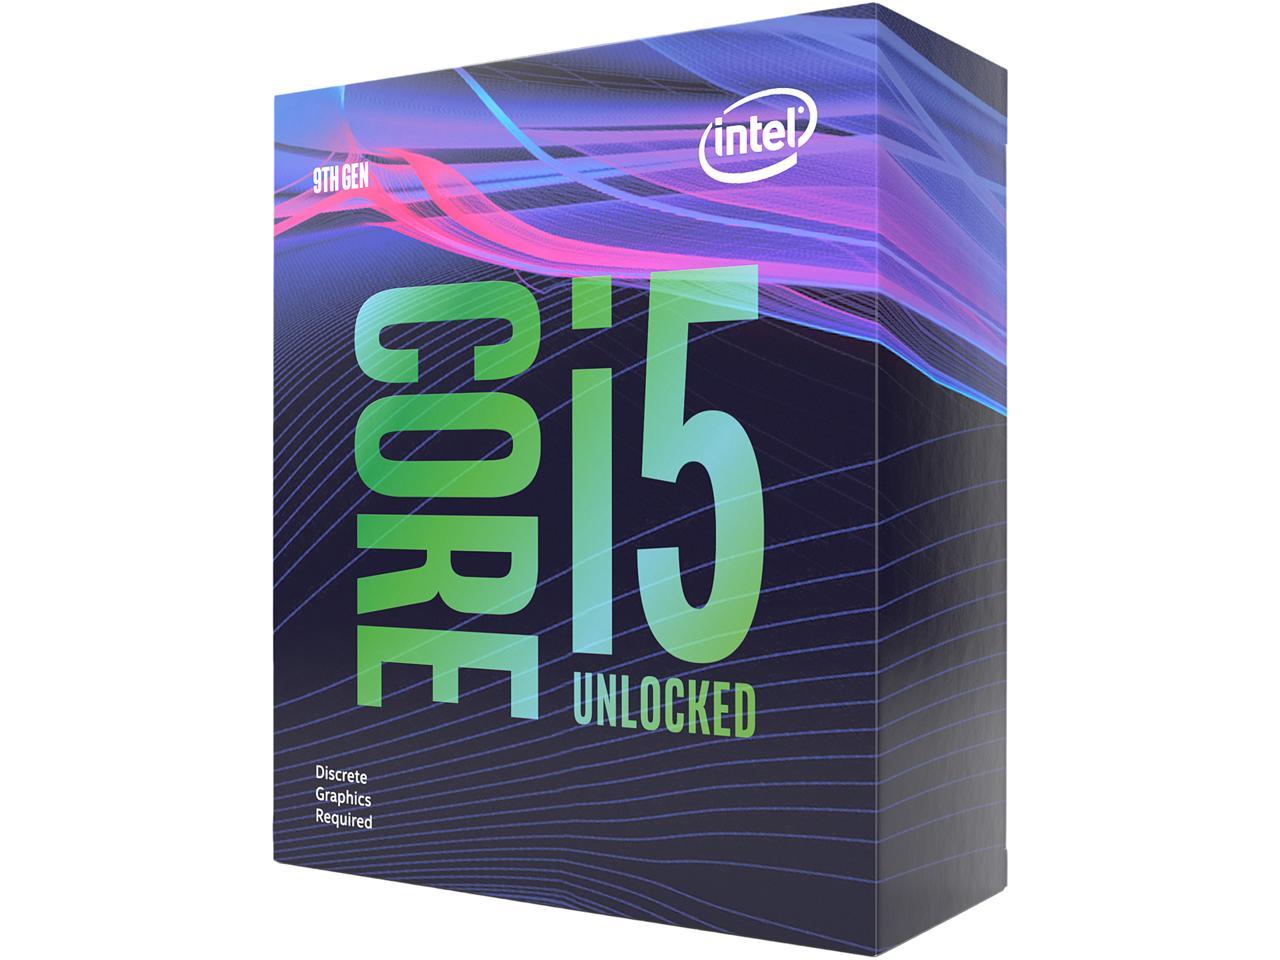
The Intel Core i5-9600KF is a relatively inexpensive Intel CPU (Central Processing Unit.)  The CPU is the brains of a PC.  Intel is the oldest, most established maker of CPUs.  This CPU would be great for a gamer PC.  It is a 9th generation processor (the newest models from Intel at the time of posting) and runs at a frequency of  3.7 GHz.

Frequency is the speed at which a CPU handles information.  In this case, the CPU works at 3.7 billion cycles per second.   FYI, that is alot. This CPU ranks at 254 on the PassMark rating, but it’s price and performance make it more than good enough for a gamer PC.

Two other really important things to consider when buying a CPU are computing cores and memory.  The i5-9600KF has 6 cores, meaning it can compute 6 different processes at the same time.  More cores means that more things can be happening in the background without slowing down the overall performance of the system.  The memory on this CPU is 9MB of L3 cache.  This is memory that the cores use while it is handling the processing on the system.  9MB is about mid-range, but will again be sufficient for a gamer PC.

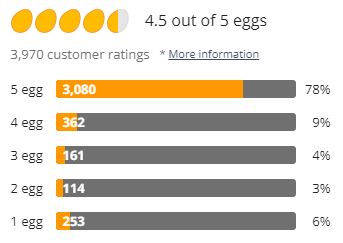
The reviews on this CPU are actually great on NewEgg.  NewEgg gives it 5 eggs(the best possible) and you can read all the reviews by clicking the image below.

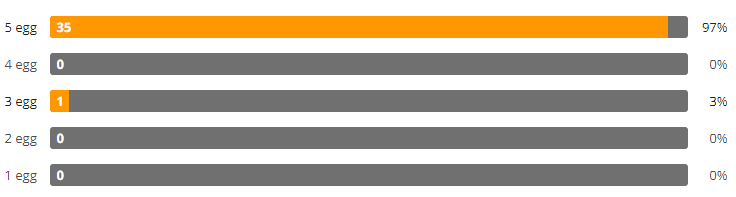
I should also note that this CPU will automatically increase its speed to 4.6GHz when needed, this is called the “Turbo” frequency.

This CPU needs to be paired with a motherboard with an LGA1151(300 series) socket.  Any other motherboard type will not work.  It will support DDR4 2666 memory on the motherboard, which will also be a consideration when making related purchases.  Finally, a good CPU cooling solution needs to be purchased for it, this CPU does not come with a stock fan.

I highly recommend this CPU for purchase!  It will make a very responsive gaming system, as well as supporting any other needs (like research and homework.)  It is currently listed for $217.89 at NewEgg and $206.99 at Amazon.  Since the price is less, and shipping is free, I would recommend the purchase at this time from Amazon.

Works Cited

“Intel Core i5-9600KF @ 3.70GHz.” PassMark, www.cpubenchmark.net/cpu.php?cpu=Intel%2BCore%2Bi5-9600KF%2B%40%2B3.70GHz&id=3443.

“NewEgg.com.” NewEgg.com, www.newegg.com/core-i5-9th-gen-intel-core-i5-9600kf/p/N82E16819117996.

Note:  This review is part of a classroom project

Moodle Installation

Since the Moodle Docs site has been so sketchy, I decided it would be best to document my recent installation.
Note:  I am installed on a VMWare ESXi 6.5 Virtual Machine.  750GB SSD, 16GB RAM, and 8 Cores.

  • Install Ubuntu 16.04
  • If you are doing it on a VM, check Check CPU#, Increase Video RAM, and move LAN to the 1000e.
  • I immediately open root and do everything else as room
    • sudo -i passwd root
    • sudo passwd -u root
    • su
    • gedit /usr/share/lightdm/lightdm.conf.d/50-ubuntu.conf
      • Add the following lines to the bottom.
        [SeatDefaults]
        greeter-session=unity-greeter
        user-session=ubuntu
        greeter-show-manual-login=true
    • gedit /root/.profile
      • Delete last line -> mesg n
  • Reboot and logon as root
    • Update  and install vm tools
      • apt-get update
      • apt-get upgrade
      • apt-get install open-vm-tools
    • Install LAMP and required Moodle dependencies.
      • apt-get install apache2 mysql-client mysql-server php7.0 libapache2-mod-php7.0
      • apt-get install graphviz aspell php7.0-pspell php7.0-curl php7.0-gd php7.0-intl php7.0-mysql php7.0-xml php7.0-xmlrpc php7.0-ldap php7.0-zip php7.0-soap php7.0-mbstring
    • Restart the server and then create the Moodle database
      • reboot -r now
      • mysql -u root -p
        • CREATE DATABASE moodle DEFAULT CHARACTER SET utf8mb4 COLLATE utf8mb4_unicode_ci;
        • create user ‘username‘@’localhost’ IDENTIFIED BY ‘password‘;
        • GRANT ALL PRIVILEGES  ON moodle.* TO username@localhost IDENTIFIED BY ‘password
        • quit;
  • I make the folders for Moodle in the /var/www folder and initially open all permissions there.
    • cd /var/www
    • mkdir moodledata
    • mkdir moodlesql
    • chmod -R 0777 /var/www
    • If you are restoring a previous version.
      • cd /var/www/moodlesql  (or wherever the sql file is)
      • mysql -p moodle<moodle-database.sql
    • If you make a mistake you can always delete the database and start over
      • mysql -u root -p
        • drop database Moodle;
        • quit;
    • There are a couple tweaks I make to PHP before the installation
      • gedit /etc/php/7.0/apache2/php.ini
        • find “post_max_size”
        • Change the value to the number of Mb you want your site to accept as uploads
        • find “upload_max_filesize”
        • Change to the same value as above
        • Find “max_execution_time”
        • Raise to a larger value if needed (like 60-600)
  • Download Moodle from Moodle.org and extract the file to /var/www/html
    • Navigate to 127.0.0.1 in your browser and begin the installation!
  • When you are complete you may want to:
    • Reset your folder permissions
      • chmod -R 0775 /var/www
    • make your IP address a static one and then get that address permanently in the moodle config.php file until you have an actual web address to put in there.

]]>

DPC_WATCHDOG_VIOLATION

<![CDATA[Fix Windows 10 error DPC_WATCHDOG_VIOLATION
The original fault was with the IDE ATA/ATAPI controller installed with Windows 10. The fix was to use a different driver.
1. Navigate to Control Panel, Hardware and Sound and Device Manager.
2. Open the IDE ATA/ATAPI controllers section.
3. Select the controller that says ‘SATA AHCI’, right click and select Properties.
4. Select the Driver tab and Driver Details. Make sure the driver is ‘iastor.sys’. If it is, carry on. If it isn’t, try another or move on to the next step.
5. Select Update Driver Software, Browse and Let me Pick from a list of devices.
6. Select ‘Standard SATA AHCI Controller’ from the list and install.
JamieKavanagh. “How to Fix Windows 10 Error DPC Watchdog Violation – Windows 10.” Tom’s Hardware, 21 July 2016, www.tomshardware.com/faq/id-3128566/fix-windows-error-dpc-watchdog-violation.html. ]]>

What's in your backup?

<![CDATA[
As IT professionals we know that server backups are our sole responsibility.  There is no one else in the building worrying about it (until they lose stuff) and no one is looking over your shoulder.  But when the crypto-virus hits, when a catastrophic power event kills your servers, when your boss deletes the same folder for the tenth time…can you get it back?
All the training in the world will not prevent every user from clicking on that download.  I do training, I tell users not to click on unexpected attachments, but it happens.  Are you ready?  FYI, not selling anything.
Backups are easy.  In fact, with Server 2016, they are easier than easy.  In each of my VMWare machines there exists and “extra” 6TB drive.  On this drive I added an extra drive to each virtual server and setup automatic daily backups.  In general, this has been a flawless technique.  I can restore files in minutes.  Users do not have access (so the crytovirus doesn’t touch them) and they can be archived.  I use a daily batch to copy these backups weeks to another backup server, giving me redundancy.  I also have a copy in the vault that I remake every once in while.
“The cloud is better!”  I have heard that alot, but I don’t think so.  If all our user documents are on Google we are a slave to the internet.  Yes, an IT guy just said that!  Our internet goes down every single year!  There has not been a single year since I became Technology Coordinator that it hasn’t happened!  Does teaching stop when the internet goes down?  It might, if everything a teacher uses is in the cloud.  Instead, we keep most things internal.  Our LMS (Moodle,)  file servers, web servers, you name it.  If the internet goes down, we lose the internet.  Most teachers can continue without it.  Maybe a lesson is altered for the day, maybe not.  But teaching still happens.  In districts where everything is in the cloud, it comes to a standstill.
Consider monthly or weekly archival moves to the cloud, not all.  With the low cost of 6-8TB drives these days I would far rather have all these files local, and save my bandwidth for what isn’t our content.]]>

How many AD Controllers do I need?

<![CDATA[Is this a strange question?  Some would think so.  I have known  a local IT shop that had only one.  They lost it in a storm, had no backup, and paid $35K to have an IT company make a new one.  After that, they still only had one!  Later the local IT company was hired to augment the IT shop, and they immediately put in a BDC.  Theirs actually became the PDC (yes those term still exist in FSMO) and then it was later removed when their contract ended, leaving not PDC.  So, is it a bad question?  I think not.
Now the most basic answer, for a single location situation, is 2.  Just not 1!   If you have multiple locations I would have 1 at each location.  For a school district (or business) with multiple complexes, a Domain Controller at each complex location would be optimal.  Each DC should handle DHCP and DNS as well.  This allows for local logons to be optimal, with little or no delay.  Additionally I would recommend file servers per complex so that the user files are as local as possible.  A single VMWare (or Hyper-V) machine can handle these various servers (I still make separate role servers) easily.

Server 2016 lets you split DHCP ranges.  As I have different VLANs and ranges per building, I can give the building primary (the close one) most of the range.  I do this by making the VLAN on the machine at the location have no delay, and then put in a delay in that VLAN for the other DCs.  Even in a single location situation I would recommend a delay on the BDC.  This allow one machine to handle normal logons, and allows you a way to gauge your network.  I have a 1ms delay on the BDC and it gets about 5% of the logons.  This is excellent feedback that the network is running well, and is healthy.  If I had a 1ms delay and 40-60% of the logons were on the BDC, I could have an issue.
I have a 10G network with all workstations on 1G connections, including the wireless APs.  The APs are AC and can handle 200 clients, with an AP in every room.  I also have a single location situation with 1200 devices (plus student and staff BYOD connecting as well.)
Back to logon delay.  I would highly recommend playing with this to find your network sweet spot.  Find the __ms setting that results in a 10% or lower fallback to the DC that is secondary (or tertiary).  If every DC is primary on a different VLAN (the primary VLAN for the physical location) then you have fallback for heavy logon times while maintaining the fastest speeds.
With network bandwidth becoming more an issue every day, it is our responsibility as IT professionals to make the user experience and fast and flawless as possible.  We impact the business at hand, and possible loss of production, more than some realize.  Finding the sweet spot for network logons, file access, and internet access, is one the primary ways we can make the things we do in the background obvious to those we support.]]>

Tracking Laptop Usage in a 1:1 environment aka "Who stole the laptop?"

<![CDATA[
Let me start this post by ensuring you that I am on a limited budget trying to effectively manage a 1:1.  I am sure there are paid alternatives, and possibly better free ones, that accomplishes this in other ways.  But it works!
Students lose laptops, forget where they put them, have them stolen, leave them on the bus for a 3rd grader to find (kept it for 2 weeks before his parents found it) and so forth.  They usually come crying to us a few days (sometimes weeks) later and don’t have a clue where it is.  How can we find it?
I have taken a tracking approach to simply let the laptop tell me where its is, who is using it, and what wifi it is on.  I do this through a logon batch script that simply sends a email to a tracking email account on each logon.  Yep, that is a lot of emails, but it is going to an account I only logon to when I need to find one.  I use gmail filters to put them in nice little folders by class, staff…
I use SendEmail (written by Brandon Zehm http://caspian.dotconf.net/)  This is in a folder on the C drive of my student laptops, and I added a logon script to execute logon.bat each logon.  I could do it on power on, timed, whenever.  Obviously task scheduler is used to execute the task as system.  All the information on how to use his code is in a text file in his download.
To make my batch file work simply replace:

  1. gmailsmtp@gmail.com with your gmail account it is coming from in SMTP
  2. gmpassword with the password for the account above.  Assuming GMAIL SMTP
  3. trackingemail@gmail.com with the email you want to be receiving these notices.
  4. @yourdomain.com with your actual domain.  It will then be sending the email from the user email address (in the from field.)

I am using netsh wlan show interface > c:\users\%username%\profile.txt to dump information to attach.  You could do ipconfig /all > profile.txt in the section for non-wifi users to try and find where it is plugged in as well.  I found this to not be very useful, but you might.
The end result.  If a student leaves his laptop lying around.  Someone else could pick it up and take it home.  But it will be of no use since they have no logon account on that laptop.  They would have to logon to it, at school, to accomplish that.  Then they are the last logon to the laptop.  I have had a student drive in at midnight, sit in the parking lot, and logon.  Yes, that has happened.  The point is that to make it usable, they have to logon.  And  I instantly know who did it.  If I am tracking a particular laptop I can have a gmail forwarded to me the instant it is used.
I have also had a student clean one all up and sell it to another student (like I didn’t have the motherboard serial numbers) and think I wouldn’t notice.  Is this worth the time?  It certainly is to the student that doesn’t want to pay for the lost laptop!


ECHO OFF
REM Who is logging on?
set str=%username%
REM What class is the user (for GMail filtering into folders)
set str=%str:~0,2%
REM Dump the current WIFI SSID information into a file
netsh wlan show interface > c:\users\%username%\profile.txt
REM Student account start with the grad year (last 2) and if this is true…it is a student
If %str% LSS 100 goto studentlogons
REM If a non-student account is logging on, it is an “other” logon.
:otherlogons
C:\sendmail\sendEmail.exe -f %username%@yourdomain.com -t trackingemail@gmail.com -u %username% just logged to %computername% -m %computername% was logged on by User:%username% at %time% on %date% -a c:\users\%username%\profile.txt -s smtp.gmail.com:587 -xu gmailsmtp@gmail.com -xp gmpassword -o tls=yes
REM  It sent, goto end
If %errorlevel% == 0 goto end
REM If the laptop is not on WIFI, it errors, so send it without WIFI SSID Info
C:\sendmail\sendEmail.exe -f %username%@yourdomain.com -t trackingemail@gmail.com -u %username% just logged to %computername% -m %computername% was logged on by User:%username% at %time% on %date% -s smtp.gmail.com:587 -xu gmailsmtp@gmail.com -xp gmpassword -o tls=yes
goto end
:studentlogons
C:\sendmail\sendEmail.exe -f %username%@yourdomain.com -t trackingemail@gmail.com -u %username% just logged to %computername% Class:%str% -m %computername% was logged on by User:%username% at %time% on %date% -a c:\users\%username%\profile.txt -s smtp.gmail.com:587 -xu gmailsmtp@gmail.com -xp gmpassword -o tls=yes
REM  It sent, goto end
If %errorlevel% == 0 goto end
REM If the laptop is not on WIFI, it errors, so send it without WIFI SSID Info
C:\sendmail\sendEmail.exe -f %username%@yourdomain.com -t trackingemail@gmail.com -u %username% just logged to %computername% Class:%str% -m %computername% was logged on by User:%username% at %time% on %date% -s smtp.gmail.com:587 -xu gmailsmtp@gmail.com -xp gmpassword -o tls=yes
goto end
:end]]>

OHSecureBrowser Network Install

<![CDATA[Okay, so you are a 1:1 school like us.  You get all the laptops back every summer, update and clean them, and reissue them the first week of school…in August.  2 weeks later, ODE finally releases the updated version of the Ohio Secure Browser for state Air testing.  Yes, we curse and swear and wish they had given it to us in June.  How do they think we are going to get all those devices back?  Oh, they gave us an MSI to GPO install it?  Great!  Sarcasm abounds here although it is difficult to hear.
The problem with a GPO/MSI install is that the thing will take forever, and possibly fail when users simply shut the laptop off, via wifi with hundreds of devices.  Oh, it works fine on the wired devices, especially if you roll out the GPO a container at a time.  WIFI MSI installs, not so much.
So we get to why am I writing this post at all.  No not to complain (well maybe a little) but to share how I get the new software out to laptops without a ridiculous delay.  I use a shutdown script that has it copy the software in pieces.  In this case, 5 pieces.  If you have a slow network, or experience issues, you could break it down to 20, realizing that it will take 20 shutdowns to complete.  The setup is predicated on making a network share with the contents of the OHSecureBrowser folder broken into distinct parts for the install steps.  You can break this batch file down even further if needed.  I have commented the basic stages of the process as much as possible.  Below is a screenshot of my folders and the contents of stage3.

Each text file is copied into OHSecureBrowser after that step is complete.  Stage0.txt denotes that it is complete.  The batch file (below) must be in the GPO (not linked) or it will not execute since it is making administrative level changes to the file system.  Also \\server\share in the code denotes where you are sharing the OH10 folder which includes the stage files above.
Why go to all this trouble?  Network installs can really slow you down, irritate users, and obviously fail.  Breaking an install like this into little parts makes it manageable, if you have the time to do it (assume a few weeks for all the parts.)  By copying the text file last it will simply keep doing that stage until it finally finished it.  This process has worked like a charm for me and I apply this frequently with items I want to happen seamlessly in the background.


IF EXIST “c:\Program Files\OHSecureBrowser\stage0.txt” (
goto end
)
IF EXIST “c:\Program Files (x86)\OHSecureBrowser\stage0.txt” (
goto end
)
IF EXIST “c:\Program Files\OHSecureBrowser\stage5.txt” (
C:
cd \Program Files\OHSecureBrowser
copy \\server\share\OH10\stage0.txt
goto end
)
IF EXIST “c:\Program Files (x86)\OHSecureBrowser\stage5.txt” (
c:
cd “\Program Files (x86)\OHSecureBrowser”
copy \\server\share\OH10\stage0.txt
goto end
)
IF NOT EXIST “C:\Users\Public\Desktop\OHSecureBrowser.lnk” (
goto Stage1
)
:Check86
IF EXIST “C:\Program Files\OHSecureBrowser\api-ms-win-core-console-l1-1-0.dll” (
c:
cd \Program Files\OHSecureBrowser
copy \\server\share\OH10\stage0.txt
copy \\server\share\OH10\stage5.txt
goto end
)
:Check64
IF EXIST “C:\Program Files (x86)\OHSecureBrowser\api-ms-win-core-console-l1-1-0.dll” (
c:
cd “\Program Files (x86)\OHSecureBrowser”
copy \\server\share\OH10\stage0.txt
copy \\server\share\OH10\stage5.txt
goto end
)
:Stage1
del “C:\Users\Public\Desktop\OHSecureBrowser.lnk”
IF NOT EXIST “c:\Program Files\OHSecureBrowser\stage1.txt” (
C:
cd \Program Files
md OHSecureBrowser
cd OHSecureBrowser
copy \\server\share\OH10\stage1\*.*
copy \\server\share\OH10\stage1.txt
goto end
)
:Stage2
IF NOT EXIST “c:\Program Files\OHSecureBrowser\stage2.txt” (
C:
cd \Program Files\OHSecureBrowser
copy \\server\share\OH10\stage2\*.*
copy \\server\share\OH10\stage2.txt
goto end
)
:Stage3
IF NOT EXIST “c:\Program Files\OHSecureBrowser\stage3.txt” (
C:
cd \Program Files\OHSecureBrowser
md defaults
cd defaults
md pref
cd pref
copy \\server\share\OH10\stage3\defaults\pref\*.*
cd \Program Files\OHSecureBrowser
md dictionaries
cd dictionaries
copy \\server\share\OH10\stage3\dictionaries\*.*
cd \Program Files\OHSecureBrowser
md fonts
cd fonts
copy \\server\share\OH10\stage3\fonts\*.*
cd \Program Files\OHSecureBrowser
md gmp-clearkey
cd gmp-clearkey
md 0.1
cd 0.1
copy \\server\share\OH10\stage3\gmp-clearkey\0.1\*.*
cd \Program Files\OHSecureBrowser
copy \\server\share\OH10\stage3.txt
goto end
)
:Stage4
IF NOT EXIST “c:\Program Files\OHSecureBrowser\stage4.txt” (
C:
cd \Program Files\OHSecureBrowser
md securebrowser
cd securebrowser
copy \\server\share\OH10\stage4\securebrowser\*.*
cd \Program Files\OHSecureBrowser\securebrowser
md components
cd components
copy \\server\share\OH10\stage4\securebrowser\components\*.*
cd \Program Files\OHSecureBrowser\securebrowser
md extensions
cd extensions
copy \\server\share\OH10\stage4\securebrowser\extensions\*.*
cd \Program Files\OHSecureBrowser\securebrowser
md features
cd features
copy \\server\share\OH10\stage4\securebrowser\features\*.*
cd \Program Files\OHSecureBrowser\securebrowser
md VisualElements
cd VisualElements
copy \\server\share\OH10\stage4\securebrowser\VisualElements\*.*
cd \Program Files\OHSecureBrowser
md uninstall
cd uninstall
copy \\server\share\OH10\stage4\uninstall\*.*
cd \Program Files\OHSecureBrowser
copy \\server\share\OH10\stage4.txt
goto end
)
:Stage5
IF NOT EXIST “c:\Program Files\OHSecureBrowser\stage5.txt” (
xcopy “\\server\share\OH10\stage5\*.*” “C:\Users\Public\Desktop\*.*” /d /y
C:
cd \Program Files\OHSecureBrowser
copy \\server\share\OH10\stage5.txt
copy \\server\share\OH10\stage0.txt
goto end
)
:end
 ]]>

Can you remove the swap file?

<![CDATA[As we migrated to a 1:1 environment at our school I knew from experience that the only way to do it well was with all SSDs in our laptops.  My experiences have told me that users rarely put away laptops  correctly.  This leads to many problems with windows loads, ruined drives, and a lot of headache.  SSDs are a great way to save yourself a lot of headaches, as well as making your users very happy.    We had an one issue, the original laptops only had 2Gb of RAM and we were seeing SSDs last only 3 years as the use of the swap files overused the SSDs with countless writes.
This year we decided to upgrade the RAM to 4Gb and take away the swap file.  The increased RAM would theoretically reduce the need for the swap file while also eliminating thousands of possible swap file writes.  The idea could possible increase SSD lifetime many fold.

Our research on the subject always warned against removing the swap file.  But all the warnings (on a myriad of websites) seemed to be repeating the same concerns, with no actual testing.  So we decided to take the leap.
Tested systems.

  1. Dell E6500 Latitude laptops with 4Gb of RAM, 64Gb SSDs, Windows 10 LTSB (32 bit,) Office 2016, and a variety of other programs .
  2. Dell E6520  Latitude laptops with 8Gb of RAM, 128Gb SSDs, Windows 10 LTSB (64 bit,) Office 2016, and a variety of other programs .

We started with a couple dozen systems and asked students to complete a google form and let us know How things were going.  2 months in and we are up to 100+ laptops with the swap file removed.
So far our students have reported 0 system hangups and 0 blue screens.  These were the two common reasons most people said it was a bad idea.  Only time will tell if this actually extends the life of our SSDs, but to those out there saying it doesn’t work, I think your should try it before you actually advise against it.]]>

Google Chromebook Enrollment

<![CDATA[Enrolling a chromebook into your Google for Education management console is a fairly easy undertaking. 
Step 1:  Have “Place device in user organization during auto enrollment” enabled in your domain’s device management prior to enrolling the Chromebook.  The Chromebook will automatically be placed in the organizational unit that the account you use to enroll with is in.  
Step 2:  Connect the Chromebook to the proper wireless network.
Step 3:  At the login screen you will press CTRL+ALT+E to enroll the device.  
Note:  If the Chromebook is signed into before enrollment, you will need to wipe the device and restart the setup process.  To wipe the device, simply hold down the ESC, Refresh, and Power buttons down as the Chromebook is starting up.
Step 4: Sign in with your Google Apps domain and click the “Sign in” button.  Use a generic account  that is in the OU for the appropriate student group.  We made an account for each grade level and used it so all the devices would propagate to the correct OU.
Thank you to Brian Dittfeld (Technology Director, Indian Valley Local Schools).  All this in formation originally came from his presentation at OETC.
 
 
 ]]>

Ubuntu 16.04 Server Setup

<![CDATA[Okay, I am am a rogue.  My instructions are for those admins that want to use Ubuntu 16.04 as a server, but want to be able to use root when I want and the GUI when I want.  Both of these are not recommended, but in the first sentence I did say I was a rogue.  For the following, italics items are command line commands that can be copied directly into the terminal.

  1.  Install Ubuntu 16.04 desktop.
  2. Logon as your admin user.
  3. Open a Terminal.
  4. Enable root access.
    • sudo -i passwd root
    • sudo passwd -u root
  5. Enable command line login.
    • gpedit /etc/default/grub
    • Change appropriate lines to
      • GRUB_CMDLINE_LINUX_DEFAULT=”text”
      • GRUB_CMDLINE_LINUX=”text”
      • GRUB_TERMINAL=console
    • sudo update-grub
    • sudo systemctl set-default multi-user.target
    • shutdown -r now
  6. You will now be starting into command line like a normal server.  This minimizes background processes and maximizes server utilizaiton.  But you might want to use the GUI.  So logon and…
    • startx
    • You will need a new terminal window to start unity by right clicking and starting a terminal, then.
    • setsid unity
    • To log out you can use the collowing command.
    • gnome-session-quit

]]>