Category Archives: Ed Tech Teach

Educational Technology Related Tips, Tricks, and Methodologies.

Moodle – The best LMS you might not have!

Why Moodle LMS is the Best Choice for Any School

Modern Learning Management Systems (LMS) have become essential tools for educational institutions navigating the complexities of digital learning. They streamline administrative tasks, enhance teaching effectiveness, facilitate student engagement, and provide robust assessment capabilities. An effective LMS saves institutions time and resources while improving educational outcomes. However, these benefits only materialize when you choose the right platform—and that choice shouldn’t be dictated by vendor marketing budgets.

The Open Source Advantage

Many commercial LMS vendors publish articles emphasizing the “crucial need” for their proprietary solutions, conveniently leading readers toward expensive subscription models that generate recurring revenue for shareholders rather than value for educators. While these platforms may offer polished interfaces, they often lock schools into costly licensing agreements, limited customization options, and vendor dependency that can last for years.

The reality is far more promising: there’s a robust ecosystem of free, open-source LMS solutions that rival or exceed commercial alternatives in functionality, flexibility, and long-term value. Among these, Moodle stands out as the clear leader.

Why Moodle is the Best LMS for Schools

1. Proven Track Record and Scale

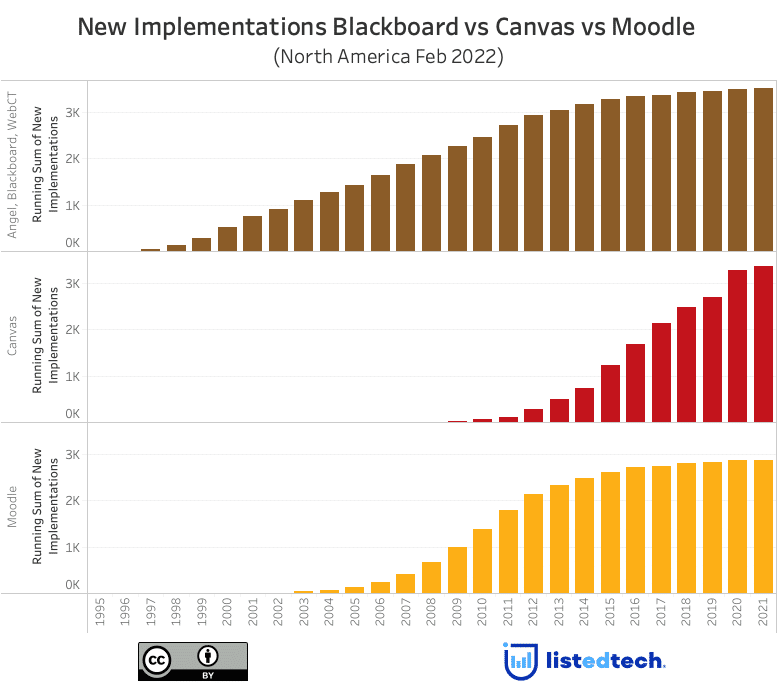
Moodle powers over 400 million users across 240+ countries, making it the world’s most widely adopted LMS. This isn’t accidental—schools, universities, and organizations choose Moodle because it delivers results. From small K-12 schools to major research universities, Moodle scales to meet any institution’s needs.  Our district began using Moodle in 2006 and it became mandated for all 5-12th grade classes 2 years later.  In that time we have been forced to reboot our Moodle server less than a handful of times, and those were usually my error in the configuration.

2. Zero Licensing Costs

Moodle is completely free and open source. There are no per-user fees, no annual licensing costs, and no surprise price increases. Your budget goes toward what matters: quality hosting, professional development, and educational content—not vendor profits.  I have talked with several schools about the total cost of ownership (the only cost being my time and the initial server cost) but those are so low compared to the commercial options, there really is no cost comparison at all.

3. Unmatched Flexibility and Customization

Unlike proprietary systems with rigid feature sets, Moodle can be tailored to your exact requirements. With thousands of plugins, themes, and customization options, you can create a learning environment that reflects your institution’s unique pedagogical approach and branding. If a feature doesn’t exist, your team or the global community can build it.  The community has 2547 plugins available for download.  If the core Moodle doesn’t have what you need, there is probably a plugin.  NTLS has an extensive number of home written plugins.  These include Elementary School Grade cards (based on indicators, not grades), automatic enrollment scripts, tardy and absentee displays, and  much more.  The ability customize Moodle is based only on your imagination.

4. Pedagogically Sound Design

Moodle was created by educators for educators. Its course structure supports diverse teaching methodologies—from traditional instruction to collaborative learning, competency-based education, and flipped classrooms. Features like conditional activities, learning paths, and comprehensive gradebook options give teachers powerful tools to personalize learning.

Students' preferences for future use of a distance-learning platform.

5. Ownership and Control

With Moodle, you own your data, control your platform, and determine your roadmap. You’re never held hostage by a vendor’s business decisions, sunset policies, or acquisition by a larger corporation. Your institution maintains complete autonomy over when and how you upgrade, what features you implement, and how you protect student privacy.  There is no need to worry about what a vendor is doing with your Moodle data, it is your data, on your machine, behind your firewall.

6. Active Global Community

Moodle’s vibrant community includes millions of educators, developers, and administrators who contribute code, share best practices, and provide support through forums and documentation. This collaborative ecosystem means continuous innovation driven by real educational needs, not market trends.

7. Enterprise-Grade Features

Don’t mistake “free” for “basic.” Current Moodle versions (like Moodle 4.5 on PHP 8) offer sophisticated capabilities including:

  • Advanced analytics and reporting
  • Mobile-responsive design with dedicated apps
  • Integration with external tools via LTI
  • Robust assessment engines with multiple question types
  • Plagiarism detection integration
  • Accessibility compliance (WCAG standards)
  • Single sign-on and authentication options
  • Video conferencing integration
  • Competency-based learning frameworks
  • Portfolio management

8. Future-Proof Technology

Moodle continues evolving with modern web standards and educational technology trends. Recent upgrades have brought improved user interfaces, enhanced performance, better mobile experiences, and integration with emerging technologies—all while maintaining backward compatibility and respecting existing investments.

The Bottom Line

When commercial LMS vendors claim their solutions are “crucial,” they’re right about the need but wrong about the answer. Schools don’t need expensive subscriptions to access world-class learning management capabilities. Moodle provides everything you need: proven reliability, pedagogical sophistication, unlimited scalability, and complete institutional control—all without licensing fees.

The best LMS for any school isn’t the one with the biggest marketing budget or the slickest sales presentation. It’s the one that empowers teachers, engages students, serves your institution’s unique mission, and respects your budgetary constraints. For these reasons and many more, Moodle remains the gold standard in educational technology.

Choose open source. Choose community. Choose Moodle.


For technical guidance on implementing Moodle or upgrading to the latest versions, consult the extensive documentation at moodle.org or connect with the global Moodle community.

Creating a Big Blue Button Virtual Machine

Assumptions:

  • You have a Linux 20.04 VM that had root enabled and available for login.
  • The VM is able to have the minimum specs required for Big Blue Button.

Prerequisites:

  1. You have an email available to use for Big Blue Button
  2. You have a subdomain available to use for Big Blue Button

1.1 Starting Off

  • Log in with root by hitting the not listed icon and inserting root in the username field then enter the password. After logging in, you will want to navigate to the following website: https://docs.bigbluebutton.org/administration/install/
  • (Note: The following steps are optional, however, every time that something went wrong with the installation I had not done these.) You will want to do the following pre-installation steps to check the requirements:
    • In terminal, use the following commands:
      • cat /etc/default/locale
      • systemctl show-environment
      • free -h
      • uname -m
      • ip addr |grep inet6
      • uname -r
      • grep -c ^processor /proc/cpuinfo
      • ufw allow 80
      • ufw allow 443                             
    • The responses you should get are as follows:
      • LANG=”en_US.UTF-8″
      • LANG=”en_US.UTF-8″ PATH=/usr/local/sbin:/usr/local/bin:/usr/sbin:/usr/bin:/sbin:/bin
      • total used free shared buff/cache available
        Mem: 15G 3.1G 1.0G 305M 11G 12G
        Swap: 0B 0B 0B
      • X86_64
      • inet6 :: 1/128 scope host
      • 5.4.x-xx-generic (Note mine did not exactly match this and it still worked.)
      • 8

1.2 Installation

  1. Download the script from the following website: https://github.com/bigbluebutton/bbb-install/blob/v2.7.x-release/bbb-install.sh
  2. Enter cd ~/Downloads into terminal. (This changes the active directory to the Downloads folder)
  3. Next, you want to make the script executable use this command: chmod +x bbb-install.sh
  4. This command runs the script: ./bbb-install.sh
  5. You should see a bunch of information regarding the script pop up.
  6. We are then going to navigate back to the website that you downloaded the script from and go to the page titled “READ ME”                     
  7. Located in the README document is the command for installing Big Blue Button, along with Greenlight. Scroll down until you see the heading titled “Installing on a Private Network”.
  8. Right above that heading, there is a command that is available to copy, copy this command and paste it into terminal.
  9. Once pasted, delete the “[options]” part and instead put in “-g”. This is to install greenlight along with Big Blue Button. You will also need to enter that email and domain that I mentioned earlier. 
  10. Once pasted, click enter and it will run the command, it will take a little while to install everything.
  11. Once done, you should see a link to the domain that you entered into the command, click on it and if you see the following screen, you have successfully installed Big Blue Button.
  12. If using with Moodle, you will need to obtain the “Secret” along with the domain. You will obtain both of these using the following command: bbb-conf –secret.

Moodle Installation

Since the Moodle Docs site has been so sketchy, I decided it would be best to document my recent installation.
Note:  I am installed on a VMWare ESXi 6.5 Virtual Machine.  750GB SSD, 16GB RAM, and 8 Cores.

  • Install Ubuntu 16.04
  • If you are doing it on a VM, check Check CPU#, Increase Video RAM, and move LAN to the 1000e.
  • I immediately open root and do everything else as room
    • sudo -i passwd root
    • sudo passwd -u root
    • su
    • gedit /usr/share/lightdm/lightdm.conf.d/50-ubuntu.conf
      • Add the following lines to the bottom.
        [SeatDefaults]
        greeter-session=unity-greeter
        user-session=ubuntu
        greeter-show-manual-login=true
    • gedit /root/.profile
      • Delete last line -> mesg n
  • Reboot and logon as root
    • Update  and install vm tools
      • apt-get update
      • apt-get upgrade
      • apt-get install open-vm-tools
    • Install LAMP and required Moodle dependencies.
      • apt-get install apache2 mysql-client mysql-server php7.0 libapache2-mod-php7.0
      • apt-get install graphviz aspell php7.0-pspell php7.0-curl php7.0-gd php7.0-intl php7.0-mysql php7.0-xml php7.0-xmlrpc php7.0-ldap php7.0-zip php7.0-soap php7.0-mbstring
    • Restart the server and then create the Moodle database
      • reboot -r now
      • mysql -u root -p
        • CREATE DATABASE moodle DEFAULT CHARACTER SET utf8mb4 COLLATE utf8mb4_unicode_ci;
        • create user ‘username‘@’localhost’ IDENTIFIED BY ‘password‘;
        • GRANT ALL PRIVILEGES  ON moodle.* TO username@localhost IDENTIFIED BY ‘password
        • quit;
  • I make the folders for Moodle in the /var/www folder and initially open all permissions there.
    • cd /var/www
    • mkdir moodledata
    • mkdir moodlesql
    • chmod -R 0777 /var/www
    • If you are restoring a previous version.
      • cd /var/www/moodlesql  (or wherever the sql file is)
      • mysql -p moodle<moodle-database.sql
    • If you make a mistake you can always delete the database and start over
      • mysql -u root -p
        • drop database Moodle;
        • quit;
    • There are a couple tweaks I make to PHP before the installation
      • gedit /etc/php/7.0/apache2/php.ini
        • find “post_max_size”
        • Change the value to the number of Mb you want your site to accept as uploads
        • find “upload_max_filesize”
        • Change to the same value as above
        • Find “max_execution_time”
        • Raise to a larger value if needed (like 60-600)
  • Download Moodle from Moodle.org and extract the file to /var/www/html
    • Navigate to 127.0.0.1 in your browser and begin the installation!
  • When you are complete you may want to:
    • Reset your folder permissions
      • chmod -R 0775 /var/www
    • make your IP address a static one and then get that address permanently in the moodle config.php file until you have an actual web address to put in there.

]]>

What's in your backup?

<![CDATA[
As IT professionals we know that server backups are our sole responsibility.  There is no one else in the building worrying about it (until they lose stuff) and no one is looking over your shoulder.  But when the crypto-virus hits, when a catastrophic power event kills your servers, when your boss deletes the same folder for the tenth time…can you get it back?
All the training in the world will not prevent every user from clicking on that download.  I do training, I tell users not to click on unexpected attachments, but it happens.  Are you ready?  FYI, not selling anything.
Backups are easy.  In fact, with Server 2016, they are easier than easy.  In each of my VMWare machines there exists and “extra” 6TB drive.  On this drive I added an extra drive to each virtual server and setup automatic daily backups.  In general, this has been a flawless technique.  I can restore files in minutes.  Users do not have access (so the crytovirus doesn’t touch them) and they can be archived.  I use a daily batch to copy these backups weeks to another backup server, giving me redundancy.  I also have a copy in the vault that I remake every once in while.
“The cloud is better!”  I have heard that alot, but I don’t think so.  If all our user documents are on Google we are a slave to the internet.  Yes, an IT guy just said that!  Our internet goes down every single year!  There has not been a single year since I became Technology Coordinator that it hasn’t happened!  Does teaching stop when the internet goes down?  It might, if everything a teacher uses is in the cloud.  Instead, we keep most things internal.  Our LMS (Moodle,)  file servers, web servers, you name it.  If the internet goes down, we lose the internet.  Most teachers can continue without it.  Maybe a lesson is altered for the day, maybe not.  But teaching still happens.  In districts where everything is in the cloud, it comes to a standstill.
Consider monthly or weekly archival moves to the cloud, not all.  With the low cost of 6-8TB drives these days I would far rather have all these files local, and save my bandwidth for what isn’t our content.]]>

Google Chromebook Enrollment

<![CDATA[Enrolling a chromebook into your Google for Education management console is a fairly easy undertaking. 
Step 1:  Have “Place device in user organization during auto enrollment” enabled in your domain’s device management prior to enrolling the Chromebook.  The Chromebook will automatically be placed in the organizational unit that the account you use to enroll with is in.  
Step 2:  Connect the Chromebook to the proper wireless network.
Step 3:  At the login screen you will press CTRL+ALT+E to enroll the device.  
Note:  If the Chromebook is signed into before enrollment, you will need to wipe the device and restart the setup process.  To wipe the device, simply hold down the ESC, Refresh, and Power buttons down as the Chromebook is starting up.
Step 4: Sign in with your Google Apps domain and click the “Sign in” button.  Use a generic account  that is in the OU for the appropriate student group.  We made an account for each grade level and used it so all the devices would propagate to the correct OU.
Thank you to Brian Dittfeld (Technology Director, Indian Valley Local Schools).  All this in formation originally came from his presentation at OETC.
 
 
 ]]>

Google Drive Sync to a Network Folder

<![CDATA[Recently Google Drive stopped syncing to a network folder.  This has been a conundrum for many of us that put it there so we can access it from various locations.  There is a work around.

  1.  Download the old version of Google Drive that did work.
  2. Uninstall Drive and install the version above.  You can point it to any share during the install process.
  3. Disable Google Updates in the Task Scheduler.  If you don’t it will just update and break itself.  This will disable Chrome updates as well, so it is a trade off.
  4. Make a new registry entry to disable Drive Updates.
    1. Regedit and go to HKEY_LOCAL_MACHINE\SOFTWARE\Policies\
    2. Right click on the right hand pane and select New- Key, and name it Google
    3. Click on the new Google key (looks like a folder) to enter the folder.
    4. Right click in the right hand pane and select New- DWord 32bit value
    5. Name it DefaultUpdate and make sure the value is 0
    6. Reboot

Fingers are crossed that this works until Google changes it back to allow network shares again!
 ]]>

What every K-12 Windows District Needs

<![CDATA[Note: This post assumes you are reading this as part of the technology staff of a K-12 Windows based school district.  I am not a MAC guy and would not presume to know what a MAC district needs.  I won't bore you with my credentials, but I have been in IT a while and in education since 2003.
I have recently been helping a new tech director and came to realize that there is little guidance out there on the minimum things a good district needs.   Some of the things I have been suggesting are not at his new district and I would have assumed any tech staff would have those things.  I realize that some readers may feel some of these are unnecessary and that other items should be added.  Feel free to add your ideas in the comments section below.  These are NOT in order, I think they are all required so order seems unimportant.
1.  A VM (Virtual Machine) system.  I have almost every server virtualized.  Until 2012 I did not believe that  a virtual server could run as well as a physical one.  I was at a Spiceworks meeting and an acquaintance convinced me to try the free version of VMWare.   I now use ESXi for all my virtualization.  There are alot of reasons to virtualize servers.
2.  A helpdesk system.  I just mentioned Spiceworks so I might as well list that next.  It is great, free, fully customizable, and runs easily on any Windows machine.  There are others, but Spiceworks has a huge community and runs great.  I LOVE spiceworks!
3.  A Windows Server Update Services (WSUS) machine running and configured in your network.  After it is setup (2 hours max) and added to your group policy all your machines will stop downloading updates from Microsoft (a big deal if you have 100s of machines) and just get them from you server instead.  Mine is virtualized and on a 500Gb drive due to the size of downloads.   A properly configured WSUS downloads and accepts your defined approvals automatically.  You should not have to touch this again after setup.  You configure your AD to point to it and how the clients will process the updates.
4.  A Key Management Server (KMS) to distribute your Microsoft keys to your servers and clients.   Installing actual keys on every client takes time and puts your key out on every machine a student logs on to.   Instead, you can put your keys onto a KMS server and never activate anything again.   And, if a laptop is stolen, it will deactivate and stop working eventually.  KMS was not a must with XP when we had corporate keys that were unlimited…that is no longer the case.  Just do it!
5.  Look into the Microsoft EES agreement.  I am not a software renter by nature, but the EES agreement covers your operating systems on clients, servers, and CALs for a fraction of the cost.  It covers unlimited clients with the price based on the number of employees in the district, not the number of computers.  If you have anything close to 1:4 then you are way ahead going this route.  We added Office (again way cheaper than buying even every 10 years) and employees can install it at home as well on the base price.  It covers all the servers I am mentioning.
6.   An Imaging solution.  We use FOG.  I know there are lots of options and I have tried a couple.  I have been using it for several years and am very happy with it.  Free, PXE client boots, and works with everything we have tried.  In the educational environment we reimage machines all the time, if you don’t you should.  Labs are done almost monthly.  It refreshes the KMS server count and makes sure that the testing systems are ready to go each cycle.  I have all my servers pulled with FOG as well as images for my labs and other machines.
7.  Fresh images for your machines.  It goes without saying that being able image without having good images is worthless.  I have a VM that holds the pertinent images.  I update them there and repull them before doing anything major.  Having a good imaging server and good images makes your life so much easier.  These two items alone are worth their weight in gold.  Every time we start a testing cycle I reimage (it is just a click on the Web GUI) all my testing machines.  I know they are all fresh and ready to go.  I also know that if I am spending more that 30 minutes on a software issue that instead I can just image a machine in 10 minutes (6 minutes to image and 2 reboots to rename and rejoin…all automatic.)
8.   2 AD servers.  I think it goes without saying that a sole AD is a terrible idea.  But I do know at least one tech director that only had one, and then it failed.   I have one physical and one virtual.  I would recommend one at each campus if you are a multi-campus district.  The AD should be organized in both the user and computer categories so you can have manage them with good group policies.  My AD server does DNS and DHCP as well.
9.  Group Policies you can easily maintain.  If your AD is well organized, then good maintenance of your network is much more efficient with good policies.  I install all printers, network drives, software installs, all through policies.  That being said, too many policies can slow your network and ruin the user experience.  Take care!
10. An LMS (Learning Management System.)  There are a number of good ones.  We use Moodle.  It is the most full featured, very configurable, and the most powerful.  It is not the easiest or the most intuitive.  It will require PD, especially for your less tech savvy teachers, but is without doubt the best free option.    It doesn’t matter which LMS you choose if you at least have one.  No school should be without an LMS is this day and age.
11.  Become a Google district.  Even if you use Office 365 (which we could but don’t) then there are enough things to make GAFE a great choice and make it worth your time.  It is of course free, with unlimited storage, and a requirement to use Chromebooks in your school.  It is worthwhile just to provide your teachers each a YouTube account to save classroom videos.   It is also a great place to keep all PD videos for your district.  I record almost every PD session and more to provide a repository for staff to peruse at their convenience.
There are alot of parts that make up a good district.  These are just some that seem to be missing in some districts I have helped.]]>

Thin Clients really can win!

<![CDATA[I will say from the onset of this article up until recently I would have called myself a thin client opponent, not a proponent.  My early experiences with thin clients were not pleasant.  Servers stretched to thin, poor performance, and inexpensive PC options made thin clients seem like a bad choice.  But two years ago we purchased an Firefly 208R2 Server and L300 thin client lab for a hot, poorly powered room that changed my mind.
This setup worked out so well we decided to look into configuring like systems inhouse.  We used old Dell D600 laptops and set them up to autologon and connect to a 2008R2 remote desktop server.   This ue of low end, old machines connecting to a Dell Optiplex 780 seemed like a perfect match.  We setup the system similar to the Firefly system with a VelociRaptor Hard Drive and 16Gb or RAM.  We found that 25 clients seemed to be the sweet spot, with 30 being a max for the system.
A great thing happened just as we were getting started, we got 210 free WYSE Z90D7 systems from the military DoDCFL program.  These Windows 7 thin clients had 4Gb DDR3 RAM sticks and with a little experimenting were easily setup.  We actually pulled the 4Gb sticks to use in the 780 systems and put 2Gb in them.  Furthermore we purchased SSD drives for them.  To say they rock is a vast understatement.  We put a 780 in every few classrooms (they were a workstation as well as a the server) so that no server  had more than 20-25 clients.
Systems logon in just a few seconds.  Students only make 1 profile per server.  I only need to update  5 systems for the entire middle school…I could go on and on.  The main takeaway is that making a thin client server is easy, and very responsive.  Just like using VMWare on a server to host multiple servers, you can use 2008R2 to host multiple workstations.
If you haven’t tried thin computing lately, I suggest you give it a try, you will not be displeased!]]>

If you don’t FOG, you are nuts!

<![CDATA[FOG Project
FOG stands for Free Open-Source Ghost.  I used to use Ghost, purchased before I came to NTLS, but I refused to spend the amount required for the new version.  I have used FOG for some time, and frankly is was very useful.  We use version 0.32 to clone drives in our tech room.  We utilize old Gateway laptops with external USB drive docks to easily drop drives in, image, and replace back in machines.  We had tried the new version of FOG but went back to 0.32 when the new version was incompatible with external USB drive connections (tried several.)  We were content with our usage.

Last week,  I attended the OETC Conference and found out how underutilized our implementation truly was.  We went to a FOG session hosted by Casey Ailiff from Kent City School District and Chris Carman of Roosevelt High School.  I humbly give credit for the changes we made and everything that follows, to them.

FOG 1.20 can be hosted from a centralized location virtual server, easily setup and deployed on a Ubuntu 12.04 (my favorite currently) VM in about an hour. The installation is easy and fairly detailed on their webpage. The problem is that in the past I had simply installed FOG and used it right out of the box with no additional configurations.
The first thing I found I needed was to connect FOG to my active directory.  FOG will automatically rename and join newly imaged system IF this step is taken.  This is actually pretty simple.  The first step is to make a new account on the AD that you will set and forget.  This user has to have permissions to join systems to the AD.  The password should be complex.  You will put the password into the FOG Crypt program that is found by clicking the FOG Client/FOG Prep link which is at the bottom of every FOG page.  This link takes you to the page that you can download Fog Crypt.  This program you put the AD password into and it converts it into the string you then put into the AD configuration page in FOG.  This is one of the most important parts of maximizing FOG.  Don’t skip it!

The  next step is to prepare your image.  Use the smallest drive in your inventory and make sure you format the drive with a single partition before you install Windows 7.  Windows 7 by default makes a 100Mb partition that ruins one of the benefits of FOG.  By using a single partition image and your smallest drive (ours is a 60Gb SSD) then the image will fit on any other drive and FOG will automatically expand it to the full size of the drive when it installs.  We install Windows, do all the updates, install all our core software, and install the FOG Client Service.  We actually put everything on this image that any teacher or HS/MS student would need.  It uses 28Gb on the drive.  It is now our core image.  We then sysprep our image by copying the unattend.xml file and prepit.bat into the windows\system32\sysprep directory.  Then click on prepit.bat and it will sysprep and shut down.  We used the file that we got at the OETC class and referenced it to make our Windows 7 Enterprise version.   Yes there is a product key there, but it is the KMS one.
So now we can FOG to any Intel based PC in our district.  We made another version with all the elementary school software and sysprepped that for the elementary school.  Two images….pretty cool.  We will probably end up with a few more, but not as many as the 20+ we used to have.  But we aren’t finished yet.

The next step is to setup your machines to PXE Boot first and register them with the FOG server.  This entails hitting the down key three times when it boots, selecting Perform Full Host Registration, and letting the system boot into the FOG system.  The first thing it will ask is the system name.  You simply need to enter the name and hit enter about 8 times to get in on the system.  You can take the extra time to select an associated image, but it is easier to associate that on the FOG Webpage.  My students accomplish this task around the district after watching this flipped video.
After that you can do the rest from the FOG Webpage.  The first time we cast an image we had the system all configured and the new lab up in about an hour.  Those new systems now all have the FOG Service which allows you to do alot, including sending a new image without ever going down to the room.  If you enable the renaming service, and have the  Active Directory Join after Image Task checked, it will rename and join on its own.
About this point I was really geeking out.  In two days I had every lab in the district redone, and the hard part was making the images and remembering everything.   I used to Image systems every year, and recently I was stretched to every two or three.  Now every time I want to do a major upgrade, or just clean off all the student user accounts, I can re-image them in a flash.  There are alot of extra things you can accomplish with the FOG services, and I am just touching on a few of them.  I encourage any IT department to install FOG, play with all the options it provides, and appreciate how much this open-source program improves your school or business.
Thanks Casey and Chris!
Resources from my Apr 2015 Ohio Technology Summit Presentation  can be found here.
FOG version 1.4.4 Changes
The one change that affected us with the upgrade was the fact that the new FOG service breaks a sysprepped image.  The workaround is fairly simple.

  1. Disable the FOGService in the PC services.
  2. Drop a file in C:\Windows\Setup\scripts\SetupComplete.cmd
    1. The text inside this file is as follows.  It will reactivate FOGService when the sysprep is complete.
sc config FOGService start= auto
shutdown -t 0 -r

]]>