Category Archives: Staff Tech Reviews

Professional Technology Reviews by IT Professionals.

Setting SMTP Notifications on CyberPower OR2200PFCRT2U UPS

Required Items

  • Laptop with CyberPower PowerPanel Personal Installed
    • Click here for installation link
  • Ethernet Cable
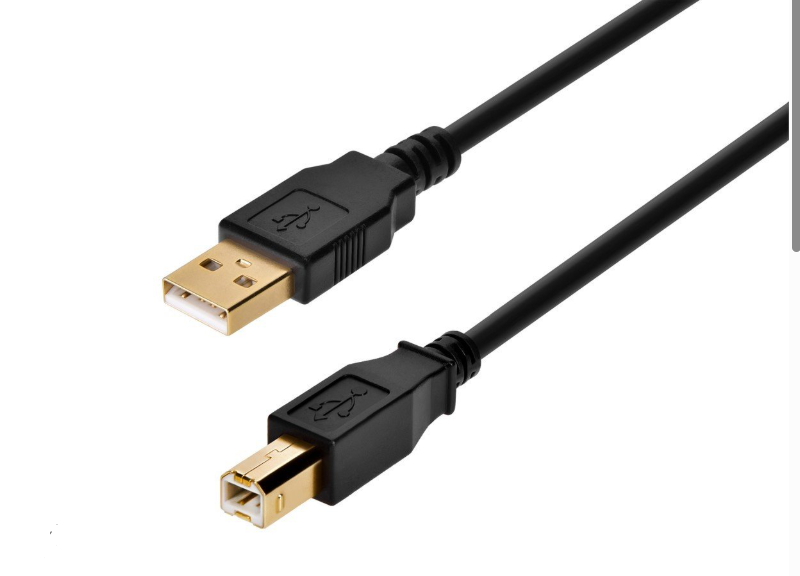
  • USB A to USB B cable (image below)

Instructions

  1. Upon locating UPS (and if necessary installing PowerPlan Personal), open PowerPlan Personal and follow the checklist below.
    • Open PowerPlan Personal
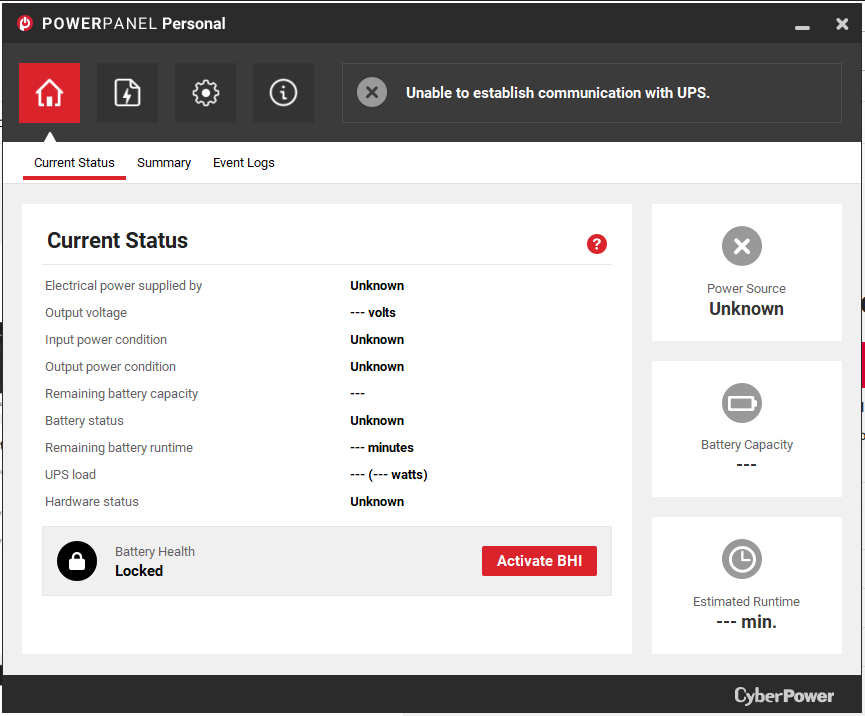
    • You will be directed to a home screen that provides the current status of the UPS.
    • At the top are four pages that you may click on. They are a house, file, a settings cog, and an info page. Click on the settings cog.
    • Below the settings cog more options will appear. Click on notification, and scroll to the bottom of the page.
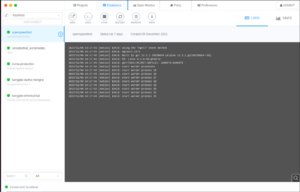
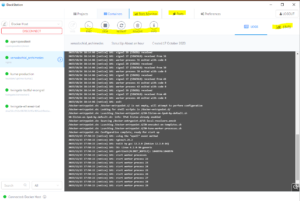
    • This page is where the email can be configured. All configurations should be filled in, however, if they are not please reference image 2. The only thing you will need to change in this process is the sender name.
    • Set the laptop in a safe place and move on to step two. We will come back to the laptop later.

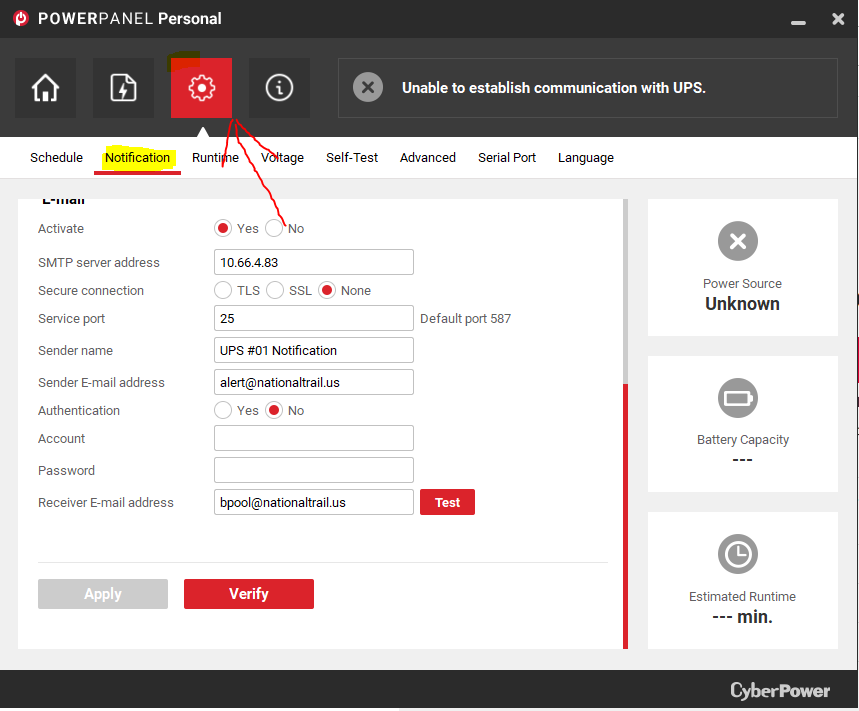
NOTE: The settings in the image above must be set as shown. If they are not, update them to match this image. The only thing that will be edited after the fact will be the sender name.

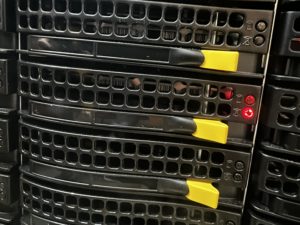
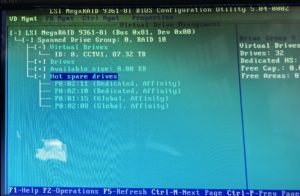
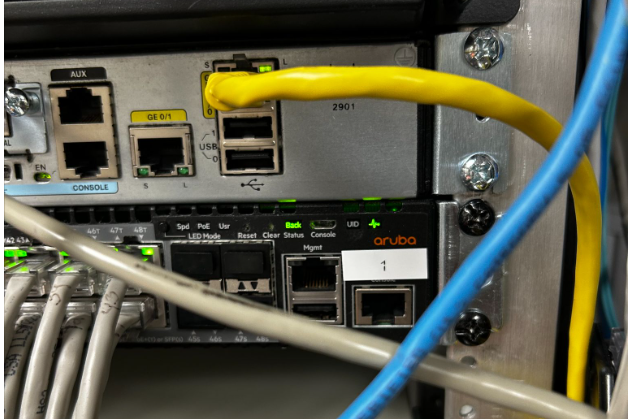
  1. Locate the top switch
    • The top switch should always be located at the top of switches in the server rack, however it is good practice to use the following checklists to verify.
      • Checklist 1:
        • It is likely that the switches will be labeled with numbers. Check the front panel of the switch for this number and locate switch one. Switch one will always be the top switch.
      • Checklist 2:
        • If the switch is not labeled you will need to locate the top switch via the switch stacking cables. The top switch will be at the top of these.
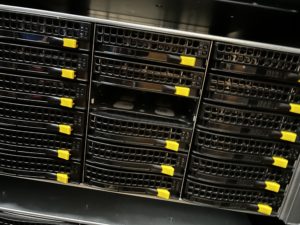
        • Some racks of camera switches in addition to communication switches, for instance, the maintenance closet which has camera switches as well. In this case, you will need to differentiate between the switches that connect to the cameras and the switches that do not. These switches will be labeled, and if they are not, check that they are connected via ethernet cables.
  2. Plug in ethernet cable to switch and UPS
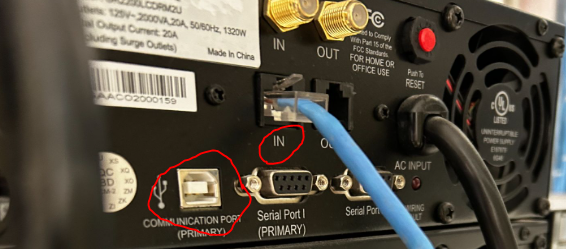
    • The UPS will have an ethernet port labeled, “in”. Plug the first end of ethernet cable into this port.
    • Using the most direct and least obstructive path, plug in the second end of the ethernet cable into the switch. It is absolutely crucial that you do not obstruct the front of a different UPS or run a cable through a slot that a UPS/Switch could fit into.
    • If at all possible, DO NOT, run the cable through existing ethernet cables, but rather run the cable behind them to avoid tangling.
  3. Final Step: Using PowerPlan Personal
    • With the ethernet cables plugged in and PowerPlan Personal opened and properly setup, plug in the USB A to USB B cable into the laptop and the correct UPS port, likely titled communication port. (image below)
    • Next, change the number in the sender name. If it is a single digit, add a 0 in front of the number.
      • Ex. UPS #11 Notification —> UPS #09 Notification
    • Lastly, click “Apply”.  If it applies successfully, move onto the next step.
    • Click “Verify”. If it verifies successfully, move onto the next step.
    • Finally, click “Test”. If it tests successfully, you have finished and may unplug the laptop from the UPS.

Moodle – The best LMS you might not have!

Why Moodle LMS is the Best Choice for Any School

Modern Learning Management Systems (LMS) have become essential tools for educational institutions navigating the complexities of digital learning. They streamline administrative tasks, enhance teaching effectiveness, facilitate student engagement, and provide robust assessment capabilities. An effective LMS saves institutions time and resources while improving educational outcomes. However, these benefits only materialize when you choose the right platform—and that choice shouldn’t be dictated by vendor marketing budgets.

The Open Source Advantage

Many commercial LMS vendors publish articles emphasizing the “crucial need” for their proprietary solutions, conveniently leading readers toward expensive subscription models that generate recurring revenue for shareholders rather than value for educators. While these platforms may offer polished interfaces, they often lock schools into costly licensing agreements, limited customization options, and vendor dependency that can last for years.

The reality is far more promising: there’s a robust ecosystem of free, open-source LMS solutions that rival or exceed commercial alternatives in functionality, flexibility, and long-term value. Among these, Moodle stands out as the clear leader.

Why Moodle is the Best LMS for Schools

1. Proven Track Record and Scale

Moodle powers over 400 million users across 240+ countries, making it the world’s most widely adopted LMS. This isn’t accidental—schools, universities, and organizations choose Moodle because it delivers results. From small K-12 schools to major research universities, Moodle scales to meet any institution’s needs.  Our district began using Moodle in 2006 and it became mandated for all 5-12th grade classes 2 years later.  In that time we have been forced to reboot our Moodle server less than a handful of times, and those were usually my error in the configuration.

2. Zero Licensing Costs

Moodle is completely free and open source. There are no per-user fees, no annual licensing costs, and no surprise price increases. Your budget goes toward what matters: quality hosting, professional development, and educational content—not vendor profits.  I have talked with several schools about the total cost of ownership (the only cost being my time and the initial server cost) but those are so low compared to the commercial options, there really is no cost comparison at all.

3. Unmatched Flexibility and Customization

Unlike proprietary systems with rigid feature sets, Moodle can be tailored to your exact requirements. With thousands of plugins, themes, and customization options, you can create a learning environment that reflects your institution’s unique pedagogical approach and branding. If a feature doesn’t exist, your team or the global community can build it.  The community has 2547 plugins available for download.  If the core Moodle doesn’t have what you need, there is probably a plugin.  NTLS has an extensive number of home written plugins.  These include Elementary School Grade cards (based on indicators, not grades), automatic enrollment scripts, tardy and absentee displays, and  much more.  The ability customize Moodle is based only on your imagination.

4. Pedagogically Sound Design

Moodle was created by educators for educators. Its course structure supports diverse teaching methodologies—from traditional instruction to collaborative learning, competency-based education, and flipped classrooms. Features like conditional activities, learning paths, and comprehensive gradebook options give teachers powerful tools to personalize learning.

Students' preferences for future use of a distance-learning platform.

5. Ownership and Control

With Moodle, you own your data, control your platform, and determine your roadmap. You’re never held hostage by a vendor’s business decisions, sunset policies, or acquisition by a larger corporation. Your institution maintains complete autonomy over when and how you upgrade, what features you implement, and how you protect student privacy.  There is no need to worry about what a vendor is doing with your Moodle data, it is your data, on your machine, behind your firewall.

6. Active Global Community

Moodle’s vibrant community includes millions of educators, developers, and administrators who contribute code, share best practices, and provide support through forums and documentation. This collaborative ecosystem means continuous innovation driven by real educational needs, not market trends.

7. Enterprise-Grade Features

Don’t mistake “free” for “basic.” Current Moodle versions (like Moodle 4.5 on PHP 8) offer sophisticated capabilities including:

  • Advanced analytics and reporting
  • Mobile-responsive design with dedicated apps
  • Integration with external tools via LTI
  • Robust assessment engines with multiple question types
  • Plagiarism detection integration
  • Accessibility compliance (WCAG standards)
  • Single sign-on and authentication options
  • Video conferencing integration
  • Competency-based learning frameworks
  • Portfolio management

8. Future-Proof Technology

Moodle continues evolving with modern web standards and educational technology trends. Recent upgrades have brought improved user interfaces, enhanced performance, better mobile experiences, and integration with emerging technologies—all while maintaining backward compatibility and respecting existing investments.

The Bottom Line

When commercial LMS vendors claim their solutions are “crucial,” they’re right about the need but wrong about the answer. Schools don’t need expensive subscriptions to access world-class learning management capabilities. Moodle provides everything you need: proven reliability, pedagogical sophistication, unlimited scalability, and complete institutional control—all without licensing fees.

The best LMS for any school isn’t the one with the biggest marketing budget or the slickest sales presentation. It’s the one that empowers teachers, engages students, serves your institution’s unique mission, and respects your budgetary constraints. For these reasons and many more, Moodle remains the gold standard in educational technology.

Choose open source. Choose community. Choose Moodle.


For technical guidance on implementing Moodle or upgrading to the latest versions, consult the extensive documentation at moodle.org or connect with the global Moodle community.

JSON issues when securing Llama with Nginx

It looks like your issue might stem from one of the following causes:

Possible Causes and Fixes:

  1. Misconfiguration in Nginx Reverse Proxy

    • If Nginx is improperly handling WebSockets or HTTP requests, it could be modifying or breaking JSON responses from your Llama 2 API.
    • Fix: Ensure your Nginx configuration includes proper proxy settings:
      nginx
      location / {
      proxy_pass http://localhost:PORT; # Replace PORT with your Llama 2 API port
      proxy_set_header Host $host;
      proxy_set_header X-Real-IP $remote_addr;
      proxy_set_header X-Forwarded-For $proxy_add_x_forwarded_for;
      proxy_set_header X-Forwarded-Proto $scheme;

      proxy_buffering off;
      proxy_http_version 1.1;
      proxy_set_header Upgrade $http_upgrade;
      proxy_set_header Connection "Upgrade";
      }

  2. Certbot HTTP-01 Challenge Interference

    • Certbot might have temporarily modified your Nginx config and is interfering with normal operation.
    • Fix: Try restarting Nginx after Certbot finishes:
      nginx
      sudo systemctl restart nginx
  3. Mixed Content Issue (HTTP vs. HTTPS)

    • If the AI server is still using HTTP but Nginx is serving HTTPS, responses might be malformed.
    • Fix: Ensure the Llama 2 backend API is also running with HTTPS or use proxy_redirect:
      nginx
      proxy_redirect http:// https://;
  4. JSON Response Encoding Issue

    • If Nginx is interfering with response headers, ensure JSON content-type is correctly set.
    • Fix: Add:
      nginx
      proxy_set_header Content-Type application/json;

Next Steps

  • Check the Nginx logs:
    nginx
    sudo journalctl -u nginx --no-pager --lines=50
  • Verify Certbot logs for potential misconfigurations:
    bash
    sudo cat /var/log/letsencrypt/letsencrypt.log
  • Try disabling Nginx temporarily and directly accessing the AI server to confirm JSON responses are correct.

Expanding Ubuntu 22.04 Drive Via Terminal

  • Assumptions
    • You need to resize a drive without a GUI.
    • You have made some backup of your VM/Physical drive
  • Notes
    • I got locked out of my Ubuntu Desktop GUI for this tutorial and have to putty to the machine as shown in the image below.
  • List you disks
    • df -h
      • You will get a large output but you need to look for something similar to this
  • Find the partition that is out of space. (mine was /dev/sda3/)
    • sudo fdisk /dev/sda
  • Delete and remake the partition (YOU WILL NOT LOSE DATA), mine was partition 3
    • d
      • delete a partition
    • 3
      • Partition 3
    • n
      • Make a new partition
    • 3
      • Make it partition 3
    • PRESS ENTER TWICE
      • Specifying the starting and ending blocks. I want the default so I press enter for both questions.
    • Y
      • Yes, delete the signature
    • w
      • Write the changes.
    • Control + C
      • Exit fdisk
  • Resize the file system
    • sudo resize2fs /dev/sda3
  • Verify the changes were made
    • df -h
      • The new size of your file system will be shown.

Docker Management

  • Assumptions
    • You have installed and configured docker using the documentation here.
  • Install Docker Desktop
    • Docker Desktop is a Windows solution to having the docker engine on Windows 10/11 (THIS CAN NOT RUN ON WINDOWS SERVERS) and can be downloaded here.
    • After running the install, there will be a checkbox asking if you want to run it using WSL2, uncheck this as most Windows systems don’t have this downloaded by default and HyperV works just as well.
    • After installing and restarting, move on
  • Install DockStation
    • This is a GUI for creating, managing, and deleting Docker containers on both remote and local Docker Hosts.
    • To install this, go the the web address here and download the Windows executable. Just run the .exe file and click next until the app is installed.
  • DockStation Configuration
    • Now that you have DockStation installed, you need to connect it to your remote server.
    • To do this go to the “Containers” top and go to the top left and edit the machine it is connected to (changing it from localhost).
    • You will then add a new connection and log in via “SSH”. You will enter the IP address of your docker host and enter a username that has access to the docker application on that host (I am going to use root).
    • You then need to make sure you have the correct connection selected and click “connect” to connect to the Docker instance.
    • Once you log in, you will be able to view your docker machines, create new ones, connect to the shell of these machines, delete them, monitor them, and so on.

Swapping HDD On LSI MegaRAID 9361-8i

  • Assumptions
    • You have powered down the machine (safely of course)
    • The server is unplugged and residual power has been drained.
  • Find the broken drive
    • This is indicated via the red LED on the front of the drive bays.
      • FLASHING RED = HOT SPARE
      • SOLID RED = BROKEN/BAD HDD
    • Remove the drive from the drive bay and replace it with a drive of the EXACT same model. If it is a different model, it can not be added as a hot spare, only as an “Up Good” drive.
  • Power on the Server
    • As the server powers on, it will conduct tests such as normal POST and gather information on the RAID controller. As the machine powers on, you will eventually come to the following screen after some minutes of booting.
    • Once this screen comes up, press “CTRL + R” to enter the raid controller settings. The screen will look like the following.
    • Once you get to this screen, press enter to enter the primary RAID controller settings.
  • Configure the drive and add it as a Hot Spare
    • Once you are in the RAID controller, it will look somewhat like the following.
    • As you can see, there are only THREE hot swap drives. We need to add the new drive to act as the fourth spare.
    • To do this, tab over to “PD Mgmt” to see all of the disks. The screen will look as follows.
    • Here you can see a list of all drives connected to the RAID controller. The one in the”JBOD” state is going to be the drive that needs to be changed.
    • To do this, press “F2” while hovering the drive to bring up the options. You will then be presented with the following menu.
    • In this menu, you will select “Make Unconfigured Good” to change the drive to an “Up Good” state. You will then go back to the menu to make it a Hot Spare.
    • Once you are back to this menu, select “Make Global HS” to make it a Hot Spare for all virtual drives.
    • You can then go back to “VD Mgmt” and expand the “Hot Spare Drives” section to see your new hot spare!
  • Reboot the Server
    • You can now reboot the machine and bring it back to full operation!

Docker Install and Configuration

  •  Assumptions
    • You have an Ubuntu 22.04 Linux server created
      • 4GB of RAM
      • 30GB of Drive Storage
  • Install Docker
    • sudo apt-get update
    • sudo apt-get install ca-certificates curl gnupg
    • sudo install -m 0755 -d /etc/apt/keyrings
    • curl -fsSL https://download.docker.com/linux/ubuntu/gpg | sudo gpg --dearmor -o /etc/apt/keyrings/docker.gpg
      
    • sudo chmod a+r /etc/apt/keyrings/docker.gpg
    • echo \
        "deb [arch=$(dpkg --print-architecture) signed-by=/etc/apt/keyrings/docker.gpg] https://download.docker.com/linux/ubuntu \
        $(. /etc/os-release && echo "$VERSION_CODENAME") stable" | \
        sudo tee /etc/apt/sources.list.d/docker.list > /dev/null
      
    • sudo apt-get update
    • sudo apt-get install docker-ce docker-ce-cli containerd.io docker-buildx-plugin docker-compose-plugin
  • Add Current User to Docker Group
    • By default, only the root user can do docker commands, you need to add your current user to the docker group in order to allow it to run docker commands.
      • sudo groupadd docker
      • sudo gpasswd -a $USER docker
      • newgrp docker
  • Test Docker installation
    • docker run hello-world
      • This command runs a test docker container to see if your installation functions normally. The output should look like the image below

Configuring Nginx for HTTPS Redirect

  • NOTES
    • If you already have nginx deployed, skip to the “Add a website for URL redirect” step.
  •  Assumptions
    • You have an Ubuntu 22.04 Linux server created
      • 4GB of RAM
      • 30GB of Drive Storage
  • Prerequisites
    • You have a DNS “A” record redirecting all subdomains to your machine.
      • For instance, if your domain is “example.com”, you need to create an A record of “*” to redirect everything to anysubdomain.example.com.
  • Download openssh (OPTIONAL)
    • This allows the user to ssh into the machine to allow for easier copying and pasting of commands
      • sudo -i
        • This puts the current terminal as a super user (can run commands as an admin).
      • apt-get update
        • Updates the current list of Linux packages.
      • apt-get upgrade
        • Upgrades all of the packages/updates the actual software
      • apt-get install openssh-server
        • This installs openssh so you can ssh to the Linux machine
    • Connect to the Linux machine via SSH (use putty or the cmd)
  • Install nginx
    • apt install nginx
      • This installs the nginx software and engine
    • systemctl status nginx
      • this will check the status of nginx, ensuring the it is running
  • Add a website for URL redirect
    • cd /etc/nginx/sites-available
    • nano yourwebsite.example.com
      • You will want this to actually be the URL you are redirecting. For instance, test.nationaltrail.us. “test” is the subdomain and “nationaltrail.us” is the domain we own.
    • Add the following configuration to the file
      • server {
        server_name test.nationaltrail.us;location / {
        proxy_pass http://10.10.8.112; # Point to test web server
        proxy_set_header Host $host;
        proxy_set_header X-Real-IP $remote_addr;
        proxy_set_header X-Forwarded-For $proxy_add_x_forwarded_for;
        }
        }

        • This redirects “test.nationaltrail.us” to “http://10.10.8.112”
    • Link sites-available to sites-enabled
      • ln -s /etc/nginx/sites-available/test.nationaltrail.us /etc/nginx/sites-enabled
        • This creates a link from sites-available to sites-enabled to allow nginx to start redirecting/have access to the configuration
    • Test the configuration
      • nginx -t
        • This should have an output such as “the configuration is OK”
    • Restart the nginx service
      • systemctl reload nginx
    • You should now ab able to go to “test.nationaltrail.us” to go to the website located at “10.10.8.112”
  • Add Certbot and secure the site
    • At this point, you are only redirecting traffic, not adding an SSL certificate. This will add encryption to secure the site.
    • Install certbot and the nginx plugin
      • apt install certbot python3-certbot-nginx
    • Secure your website
      • certbot –nginx -d test.nationaltrail.us
    • Go through the installation process. This includes adding a notification email for certificate expiration AND choosing the option for REDIRECTING traffic to HTTPS. This is the second option if you are prompted for it.
    • Restart nginx
      • systemctl reload nginx
  • Connect to your website! It should be secured unless the web app requires further proxy configuration (refer to the webpages documentation for this possibility).

Connecting to a Docker Container Using Ubuntu Terminal

  • NOTE: You can do other commands such as copy files from the container to your VM, install tools in the container, and anything that can be done on a regular Ubuntu install. For more information, look in the DOCKER DOCUMENTATION.
  •  Assumptions
    • You are using Ubuntu/Debian-based OS
    • You have Docker installed
    • You have a running container
    • You have access to the docker environment
  • Get the docker ID and list the containers
    • Open Ubuntu Terminal
      • docker ps
        • This allows you to get a list of all docker containers
    • The docker ID is the first string of numbers and letters before your container
    • Enter the docker container
      • docker exec -it <your container ID> bash
        • docker exec -it 175cb158268e bash
  • You can now execute commands in the container just as you could in a regular Ubuntu Server.

Solving Windows 10 Update Issues

Here at school, and at my home, we use an SSD for the OS and programs, and a traditional HDD for user files and data.  This requires a registry edit before a user logs on, and has worked great to save SSD space for those items that need SSD speed.

However, it appears to cause issues with major updates in Windows.  While minor updates happen frequently, major ones always fail.  I needed the major upgrade to 21H2 to make Starfall work, so it was a priority!  🙂

To fix this issue I had to do the following.

  1.  Logon with the admin account that was originally setup with windows.  This account is stored in the User folder where windows was installed.
  2. Undo the registry hack to put user folders on the D: Drive.
    1. [HKEY_LOCAL_MACHINE\SOFTWARE\Microsoft\Windows NT\CurrentVersion\ProfileList] should be returned to %SystemDrive%\Users
  3. Run the following in an administrator command prompt.  In short, it repairs the Windows installation folder.
    1. DISM.exe /Online /Cleanup-image /Restorehealth
  4. Now I ran an upgrade from a flash drive with the current Windows release…and it worked!

Hope this helps anyone else with Windows upgrade issues, or more importantly, Starfall issues!