AMD Ryzen 9 9900X Review
If you own a computer that is compatible with the AMD Ryzen 9 9900X CPU, then this is a strong option to consider. The motherboard I am using for this CPU is the ASUS-made PRIME B850-PLUS WIFI. The Ryzen 9 9900X is currently being sold for around $389.99 on Newegg and has received very positive reviews from buyers.
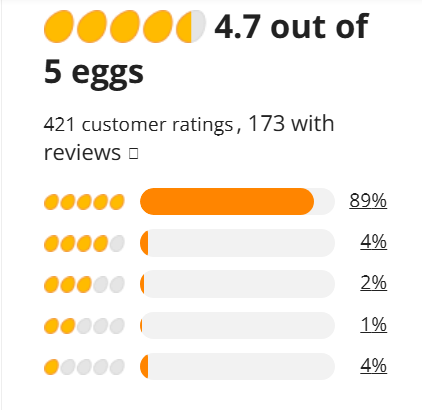
Reviews
Most of the reviews on Newegg consist of users saying that it was a good improvement over what they had before. There are some cons listed in many of the reviews, but most of them explain that while it is an improvement, it is not always a massive upgrade for gaming-focused builds. However, considering the price and performance balance, it still provides strong overall value.
Pricing vs. Performance
The price of the CPU is floating around $400. Depending on the site you buy it from, it could be slightly cheaper or more expensive. For the price, it performs very well since it can run many higher-end games and applications smoothly at the same time. During my use, multitasking performance felt very responsive, especially when running demanding programs alongside games. However, it is not always able to run every modern game at maximum graphics settings without pairing it with a high-end GPU, which is important to consider.
CPU Socket: AM5
Number of CPU Cores: 12
Multithreading: Yes
Number of Threads: 24
Maximum Boost Clock: Up to 5.6 GHz
Base Clock: 4.4 GHz
L1 Cache: 960 KB
L2 Cache: 12 MB
L3 Cache: 64 MB
Default TDP: 120W
Integrated Graphics: AMD Radeon Graphics
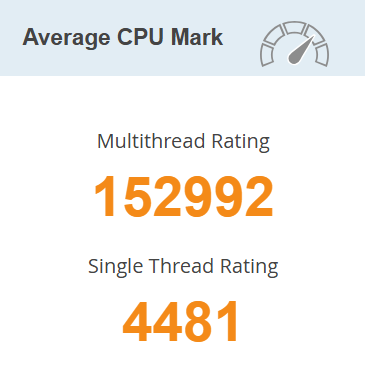
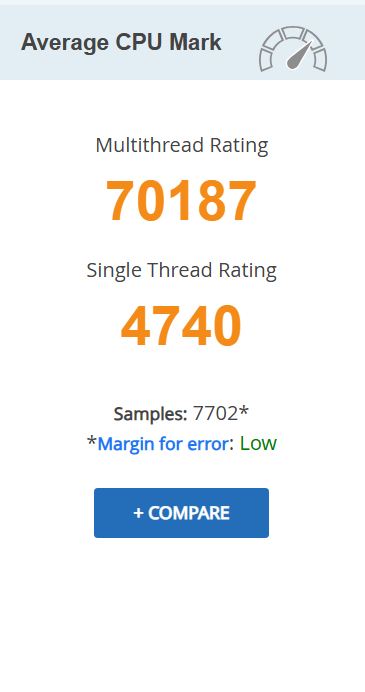
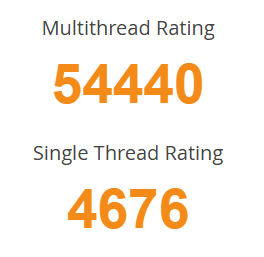
PassMark Rating
On PassMark, the AMD Ryzen 9 9900X is rated very high in both multithread and single-thread performance, while also showing consistent benchmark results across thousands of samples. According to the data available at the time of writing, it ranks among the fastest AM5 CPUs and is one of the more affordable processors within the top performance tier. This makes it a strong option for users who want high performance without paying flagship-level prices.
Final Thoughts
If you have the right motherboard with the AM5 CPU socket, then you should strongly consider buying this CPU because it performs very well, especially for its price range. Based on benchmark rankings and overall value, there are very few CPUs that match its performance while staying under the $500 price point.
If your budget is just under $400, this would be a great CPU to choose, especially considering its strong PassMark ratings and solid real-world multitasking performance. From my experience using it, the Ryzen 9 9900X offers a good balance between power, efficiency, and price, making it a reliable option for productivity and general high-performance computing.
References
“AMD Ryzen™ 9 9900X.” AMD, Nov. 2024, www.amd.com/en/products/processors/desktops/ryzen/9000-series/amd-ryzen-9-9900x.html.
“AMD Ryzen 9 9900X Benchmark.” Cpubenchmark.net, 2024, www.cpubenchmark.net/cpu.php?cpu=AMD+Ryzen+9+9900X&id=6171.
“PassMark Software – CPU Benchmarks – CPU Performance by Socket Type – Socket AM5.” Cpubenchmark.net, 2026, www.cpubenchmark.net/socket-type/am5. Accessed 4 Feb. 2026.
“AMD Ryzen 9 9900X – Ryzen 9 9000 Series Granite Ridge (Zen 5) 12-Core 4.4 GHz – Socket AM5 120W – Radeon Graphics Processor – 100-100000662WOF.” Newegg.com, www.newegg.com/amd-ryzen-9-9000-series-ryzen-9-9900x-granite-ridge-socket-am5-desktop-cpu-processor/p/N82E16819113842. Accessed 4 Feb. 2026.
“PRIME B850-PLUS WIFI.” ASUS Global, 2024, www.asus.com/motherboards-components/motherboards/prime/prime-b850-plus-wifi/. Accessed 4 Feb. 2026.
This review is part of a classroom project.